Aavegotchi is a blockchain play-to-earn game that is built on the Ethereum scaling solution Polygon. I have created this detailed guide that will help Australians get their first Aavegotchi.
The 3 Things I Love Most About Aavegotchi
THE INTEREST: Aavegotchi is a fun way to earn interest from the decentralised lending platform Aave, as every Aavegotchi requires a minimum amount of interest-bearing tokens before you can summon your virtual ghost. The interest-bearing tokens will automatically grow inside your Aavegotchi over time.
THE FARMING: You can earn money from your Aavegotchi by competing in rarity farming in three different categories rarity, kinship and experience. Rarity can be increased by selecting the best traits for your Aavegotchi and dressing your Aavegotchi with wearables. Kinship is developed by petting your Aavegotchi once every 12 hours and experience is grown by voting on governance proposals and playing minigames.
THE COMMUNITY: Aavegotchi has a strong community of people that want the game to succeed. We have people from the community building tools and minigames, helping out newbies on Discord, and creating and voting on proposals that will govern the way the game will evolve through the Aavegotchi DAO.
7 Steps to Get Your First Aavegotchi
In order to get your first Aavegotchi in Australia, we will need to complete the following steps which I will walk through in detail in this post.
- Create an Ethereum wallet using Metamask
- Setup Metamask to use the Polygon network
- Purchase ETH via the cryptocurrency exchange Coinjar and transfer ETH to your Metamask wallet
- Use the Matic Bridge to move ETH from the Ethereum Mainnet to the Polygon network (formerly known as Matic)
- Swap Ethereum for GHST on Quickswap
- Buy a Portal from the Aavegotchi.com Baazaar
- Summon your first Aavegotchi
At the end of this post, I will also cover how you can make money with your Aavegotchi.
Setup an Ethereum Wallet Using Metamask
In order to play Aavegotchi, you will need an Ethereum wallet.
Metamask is the most popular Ethereum wallet and it is supported in major browsers including Chrome, Firefox, Brave, and Edge and is also available as mobile apps on Android and iOS.
Be careful when installing Metamask to only install the Metamask app from https://metamask.io/, there have been cases of fraudulent applications impersonating Metamask and even appearing in search engine advertisements that can steal any funds you deposit into it.
Follow the Download link on https://metamask.io/ to download the Metamask application for your preferred web browser or mobile operating system.
I have embedded a great YouTube tutorial created by Every Bit Helps below that shows the process in detail for installing Metamask.
Make sure you securely store the password for Metamask and the 12-word seed phrase. If you lose these, you will not be able to access your funds. Also if the seed phrase is stolen, the funds from your wallet can be drained.
I would recommend getting a hardware wallet such as a Ledger or Trezor to store your funds as an additional layer of security especially if you are going to be storing more than $1000 AUD of cryptocurrency.
Configure Metamask to use Polygon
The Aavegotchi game is built on top of the Polygon network which is a scaling solution for Ethereum. Due to the congestion on the Ethereum network, transaction fees are costly, making it unsuitable for gaming.
The Polygon network is a side chain of Ethereum, it leverages the security of Ethereum and brings down the transaction costs to a fraction of a cent while speeding up block times.
For a more in-depth video on Polygon check out the YouTube video by Finematics embedded below.
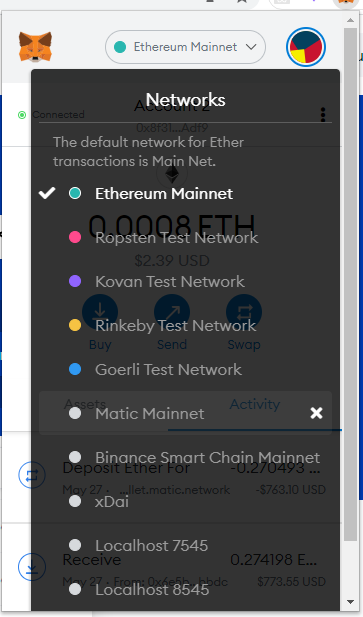
To use the Polygon network in Metamask we will need to add a new custom RPC.
Step 1) Open Metamask and select “Ethereum Mainnet”
Step 2) Select “Custom RPC”
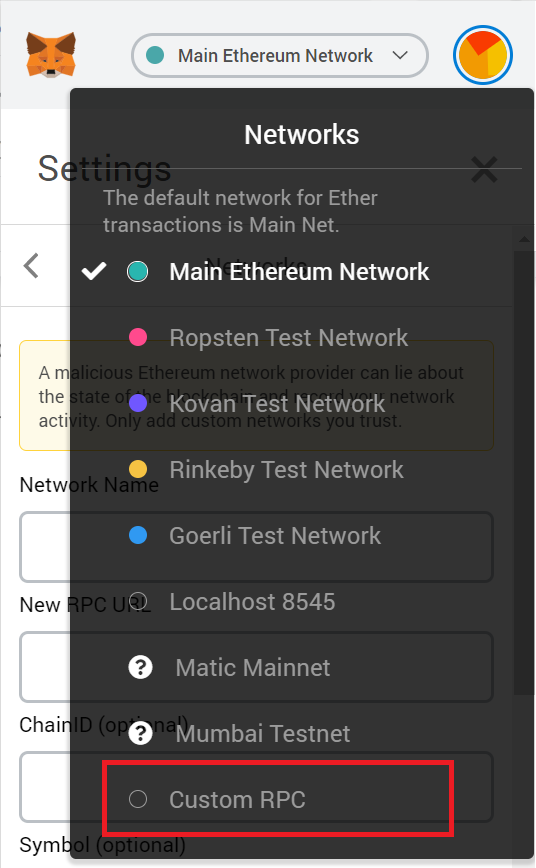
Step 3: Enter the following settings and select “Save”
Network Name: Matic Mainnet
New RPC URL: https://rpc-mainnet.maticvigil.com/
Chain ID: 137
Currency Symbol (optional): MATIC
Block Explorer URL (optional): https://explorer.matic.network/
Now you have added the configured your Metamask to be able to use the Polygon network.
You can switch from Ethereum to Polygon, select “Ethereum Mainnet” in Metamask then select “Matic Mainnet”. To move back to Ethereum from Polygon select “Matic Mainnet” then select “Ethereum Mainnet”.
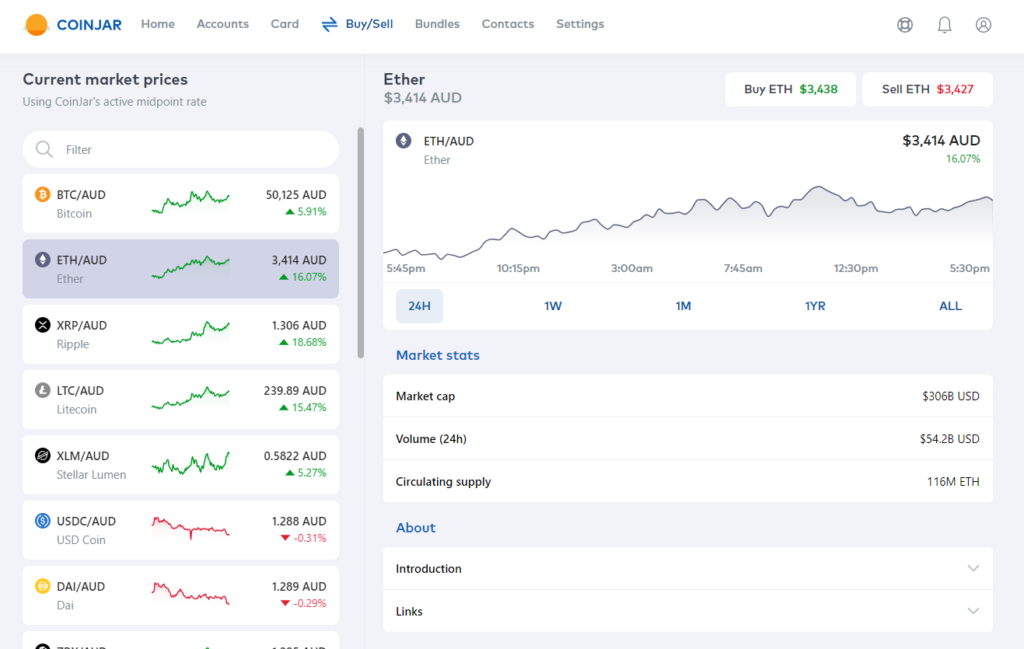
Purchasing ETH via Coinjar
Note: I have chosen to use Coinjar to purchase ETH, but there are many cryptocurrency exchanges available to Aussies that you can pick from. If you don’t wish to use Coinjar, you may purchase your ETH elsewhere and skip this part of the tutorial.
We will need the Ethereum cryptocurrency to move our funds from the Ethereum Mainnet onto the Polygon network where we will be able to acquire our Aavegotchi.
Coinjar is a cryptocurrency exchange available to Australians. It is very easy to use and it has reasonable fees. You can fund your account in Australian dollars using payment methods popular in Australia including Pay ID, BPAY, cash deposits using Blueshyft and Mastercard and Visa credit/debit cards.
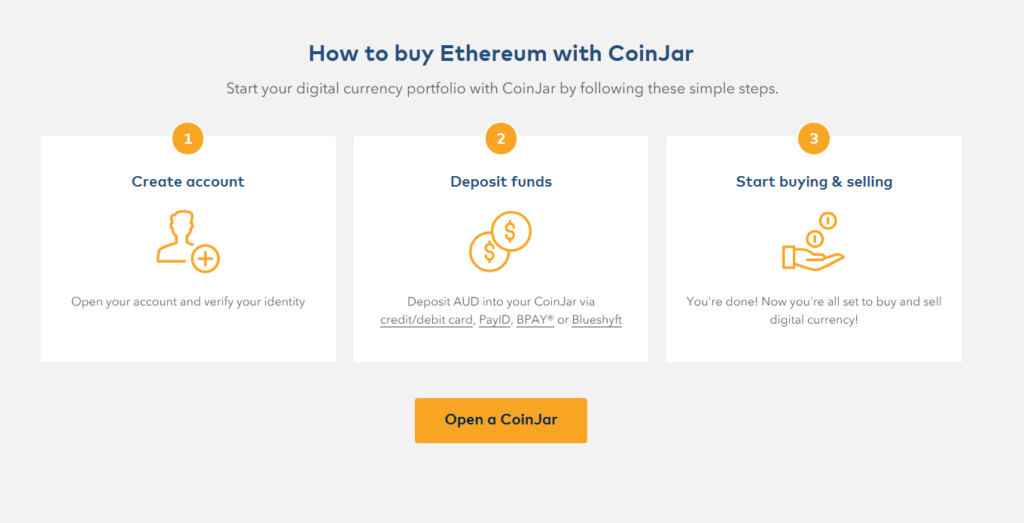
In order to buy Ethereum with Coinjar, you will need to sign up and create a Coinjar account. You will need to verify your identity then you will be able to fund your account with Australian Dollars via credit/debit card, PayID, BPAY, or Bluesyshft.
If you sign up to Coinjar and complete your identity verification through my referral link we will both receive 500 CoinJar Rewards Points which can be used to reduce trading and withdrawal fees.
Once you have funded your account with AUD, you will be able to buy ETH from the cryptocurrency exchange.
The ETH you will purchase on Coinjar will need to cover the following:
- Ethereum transaction fee to move your ETH from your Coinjar account to your own Metamask Ethereum wallet. This fee will be shown to you in Coinjar when you withdraw your ETH to your wallet.
- Ethereum transaction fees to bridge your ETH into the Polygon network. This varies based on the congestion of the ETH network.
- ETH to convert into GHST to use to purchase a portal from the Aavegotchi Baazaar.
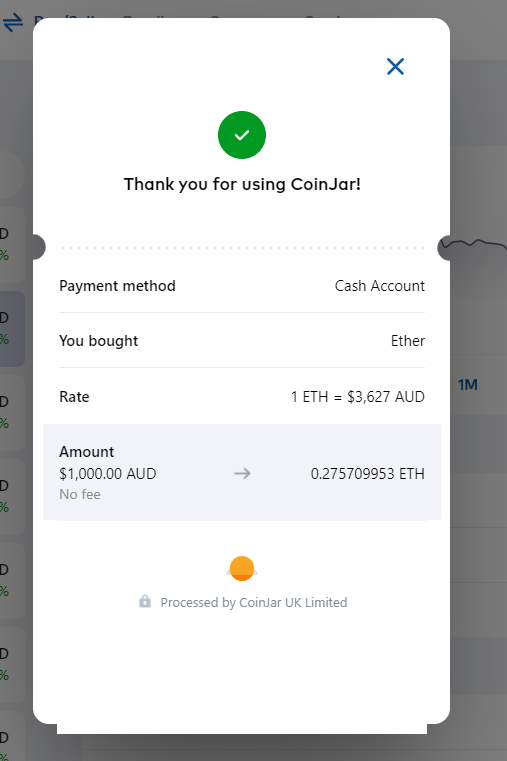
To purchase ETH in Coinjar, first fund your cash account in Coinjar with AUD, I will be purchasing 1000 AUD of ETH and I will fund my account instantly using the PayID option.
After that, go into the “Buy/Sell” tab and select the “ETH/AUD” pair.
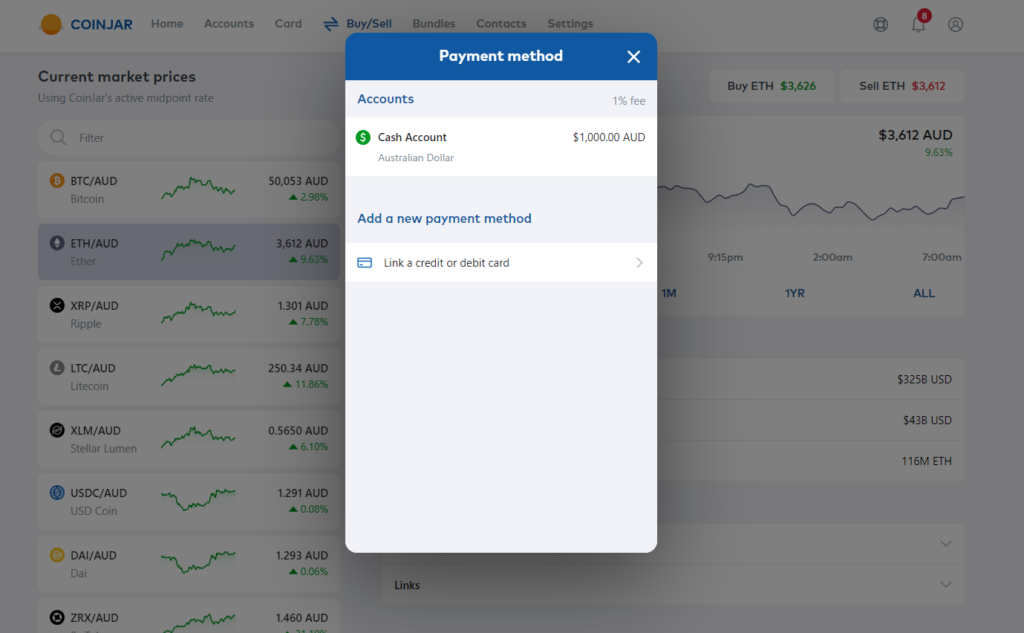
For the payment method, I will select the Cash Account.
Then I will enter 1000 AUD in the amount screen and select the next button.
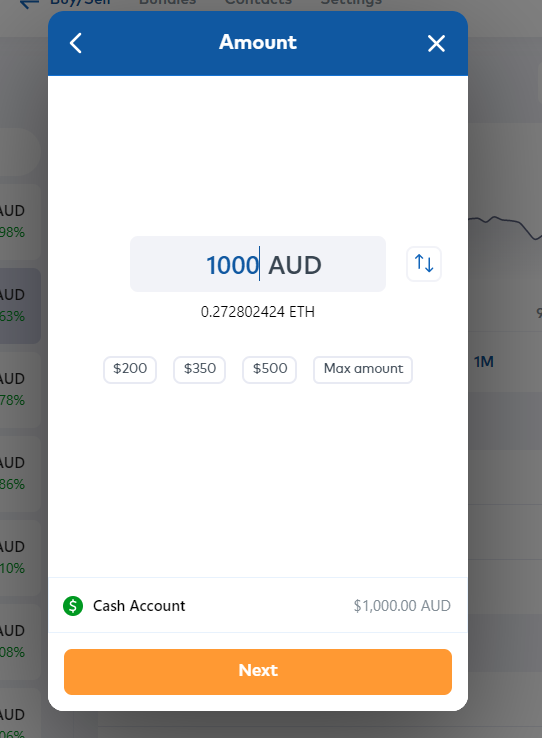
Coinjar will display the amount of ETH you are purchasing for your AUD along with a 1% Coinjar fee which can be avoided by spending Coinjar Rewards Points if you have enough. To proceed select the confirm button.

It will then show you the amount of ETH you purchased.
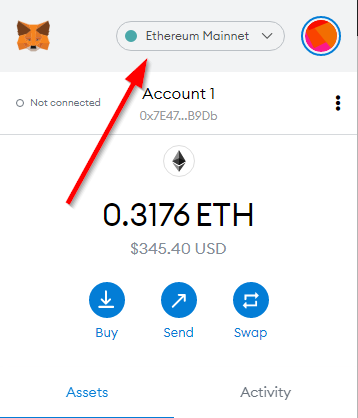
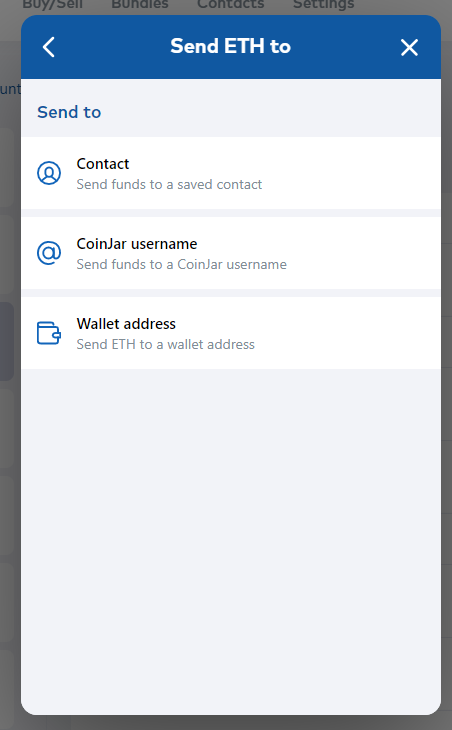
If you go into the Accounts tab and select your Everyday Ethereum account you can see the ETH you have purchased. Now we will move these funds to our Metamask wallet by selecting the Send button.

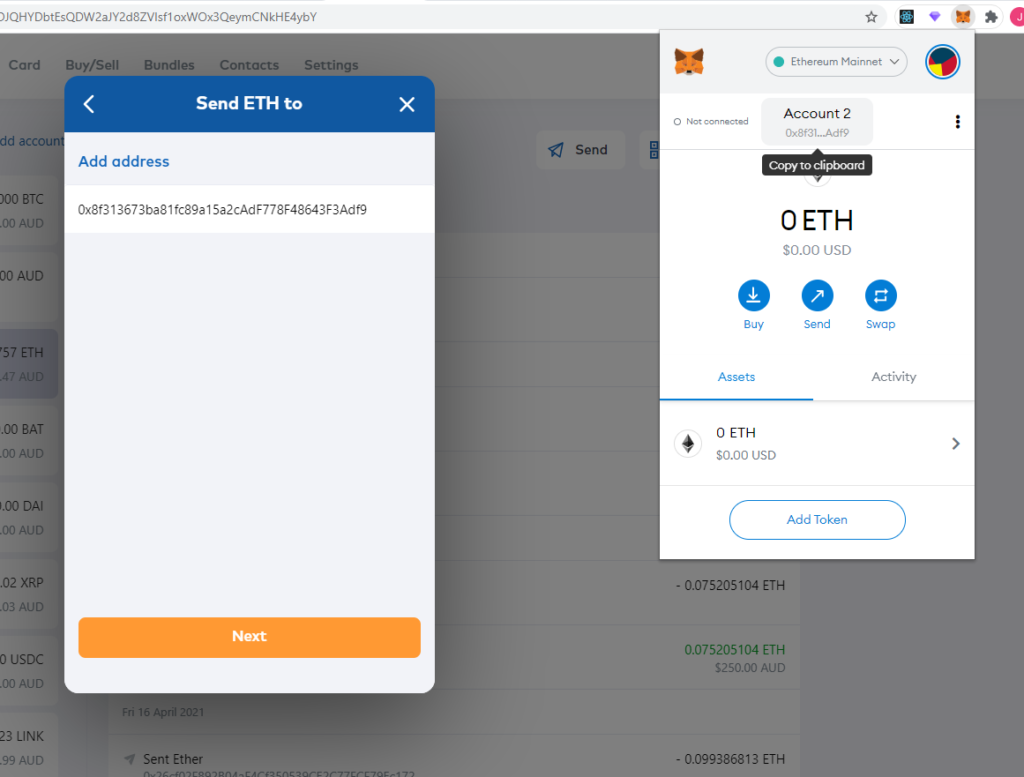
Select Wallet address.
Open Metamask and select your Account to copy the account address to the clipboard and then paste it into the address in Coinjar and select next.
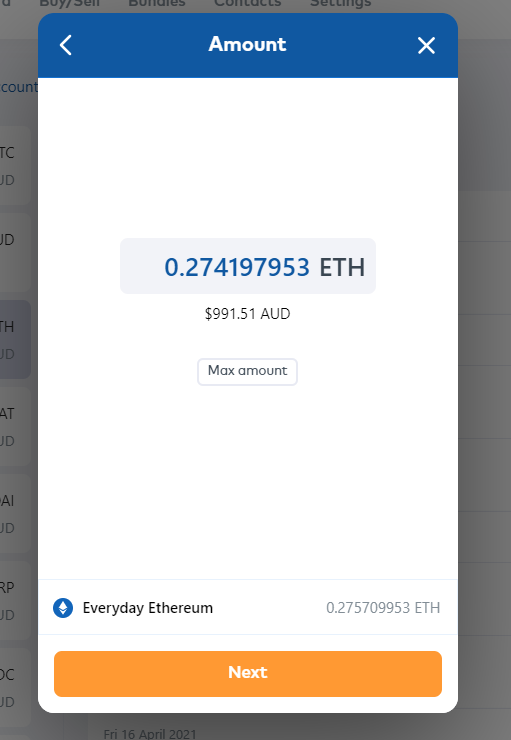
Select the “Max amount” button to send all of your ETH in Coinjar to your MetaMask wallet address, then select Next.
Next, you will see a review screen, you will need to put a transaction fee to move these funds into your Metamask Wallet, if you have sufficient Coinjar Rewards Points you can spend them to avoid this fee. When you are ready select Confirm.
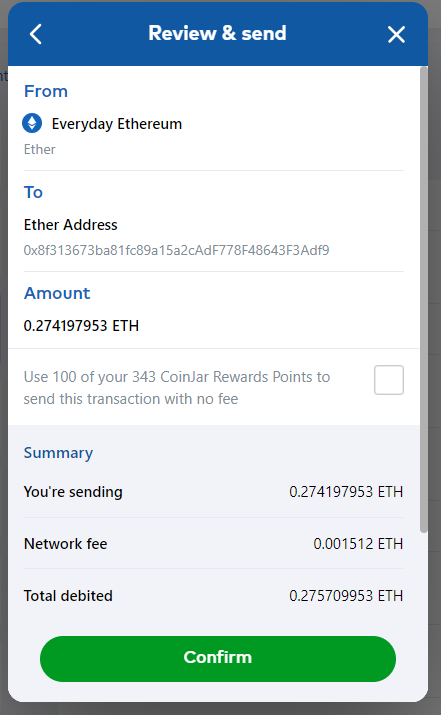
Next, you will see a summary screen show the amount you sent and the network fee charged.
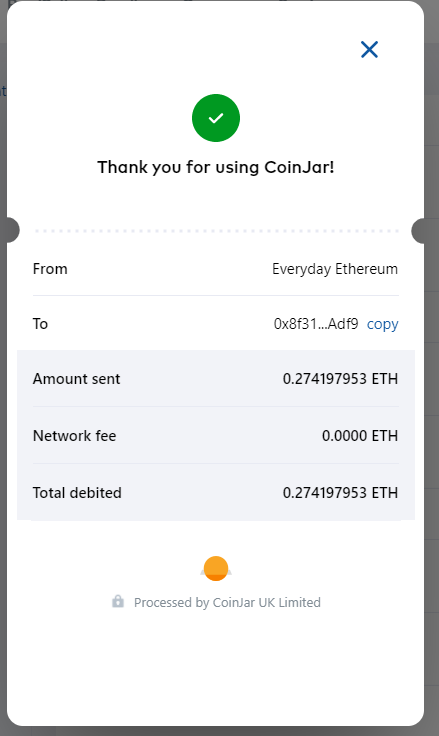
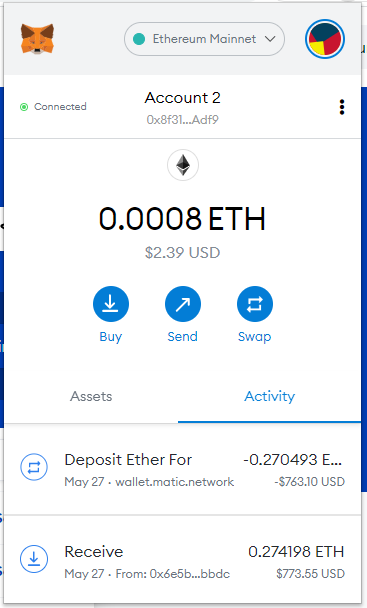
You can check the status of the withdrawal, in the Accounts tab and selecting the transfer transaction in your Everyday Ethereum account. Eventually, the funds will come through to your Metamask account.
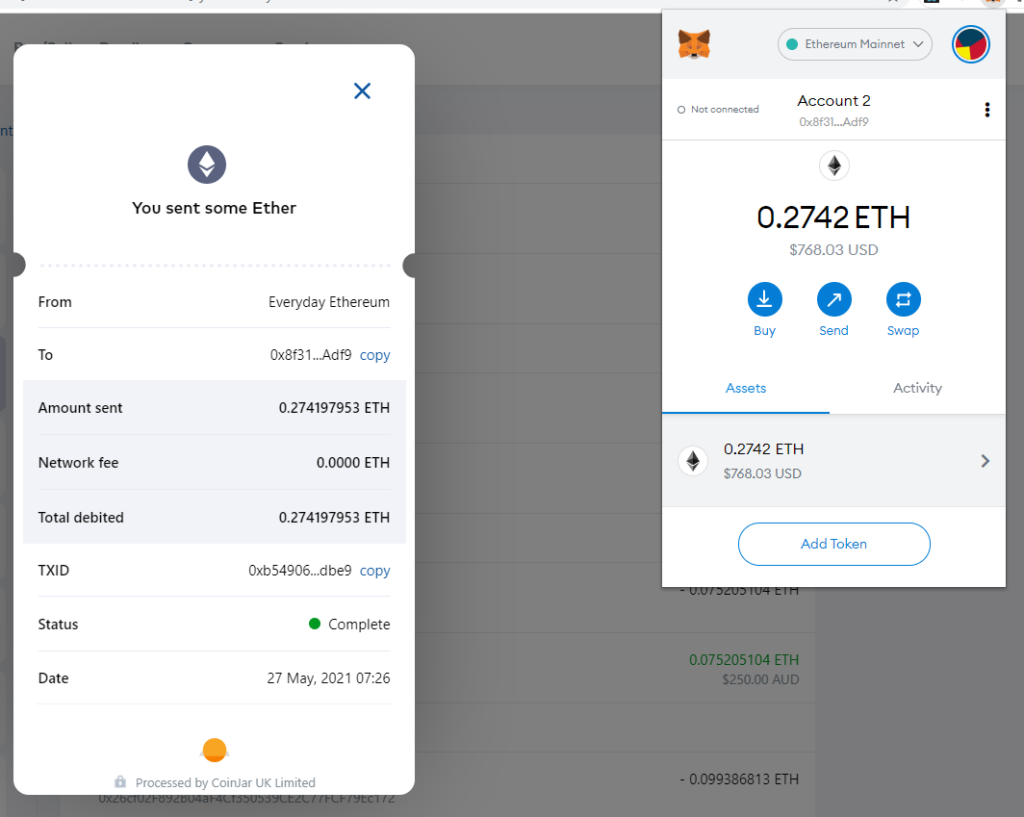
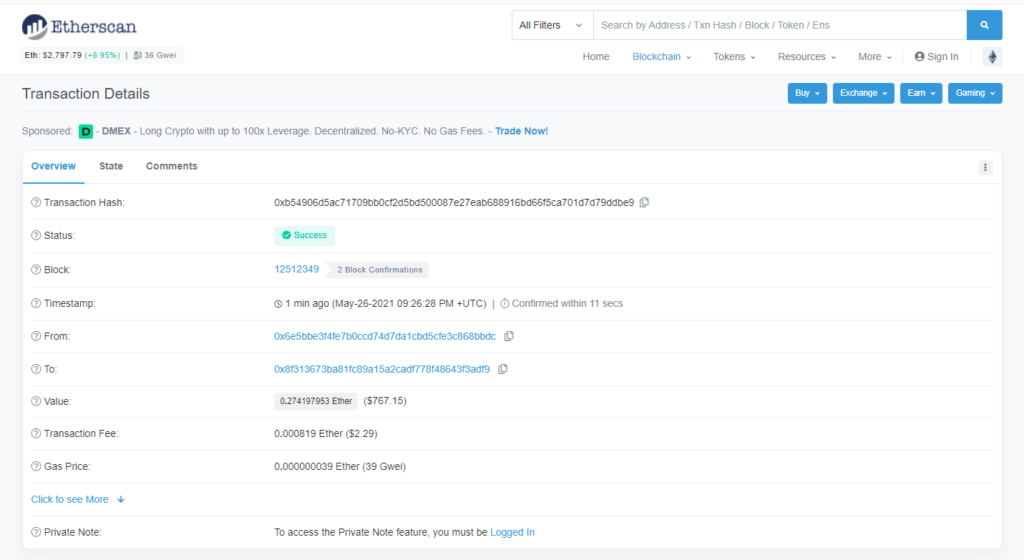
You can check the status of the transaction on the Ethereum blockchain explorer Etherscan by copying the TXID and pasting it in the search.
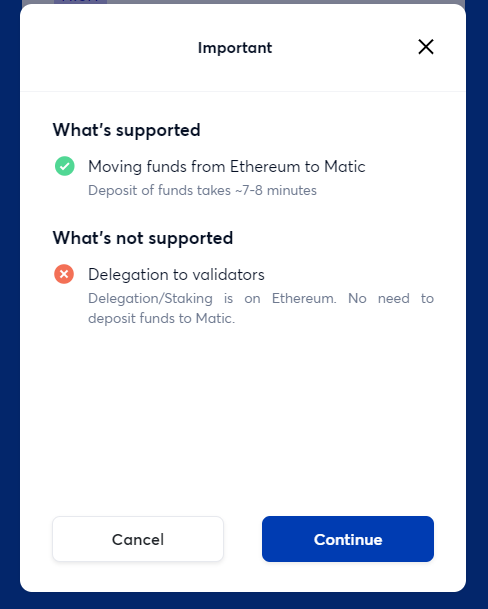
How to Get onto Polygon
Next, we will use the Polygon PoS bridge to move our ETH from Ethereum Mainnet over the Polygon network.
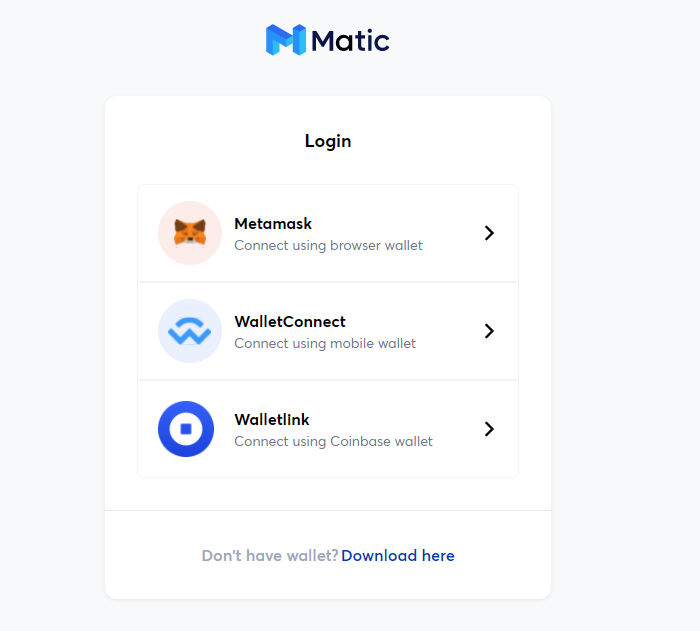
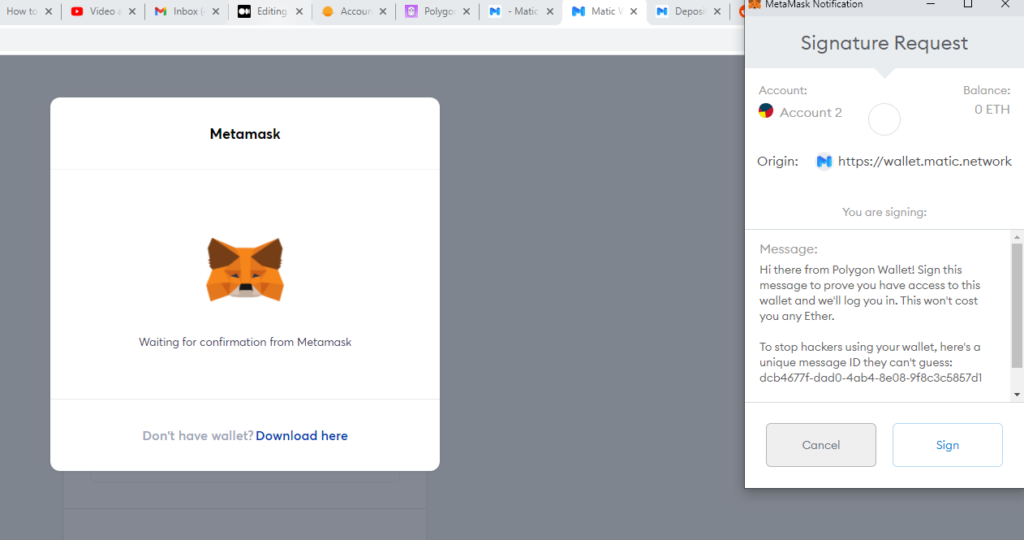
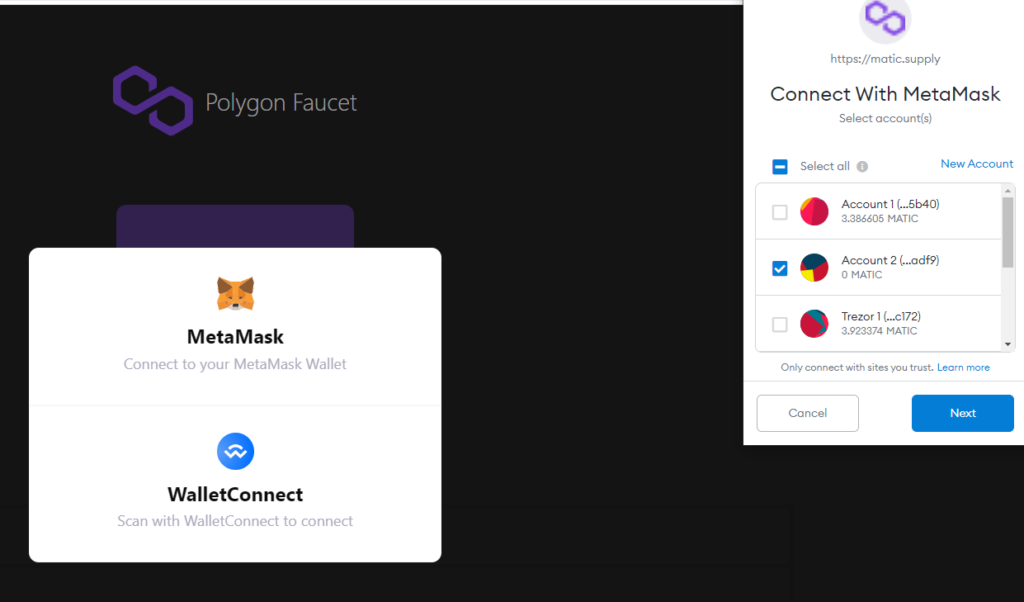
In Metamask, select the Ethereum Mainnet network then visit https://wallet.matic.network/ and log in using your Metamask wallet by selecting the “Metamask Connect using browser wallet” button.
You will see a Signature Request transaction popup in Metamask, select the “Sign” button.
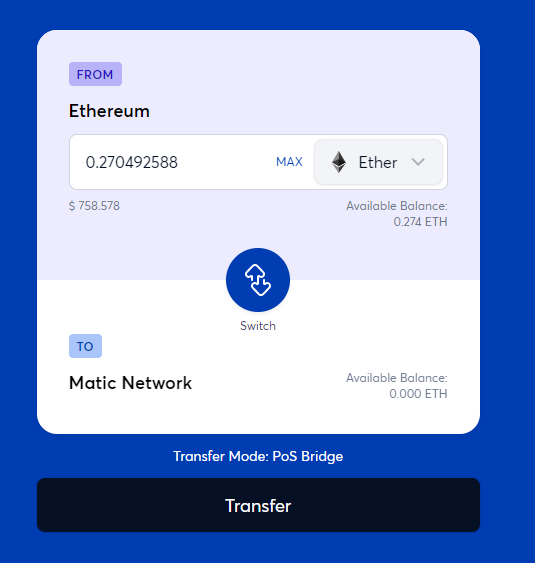
Select the “Move funds to Matic Mainnet” button.
Enter the amount of ETH you wish to transfer and select the “Transfer” button.
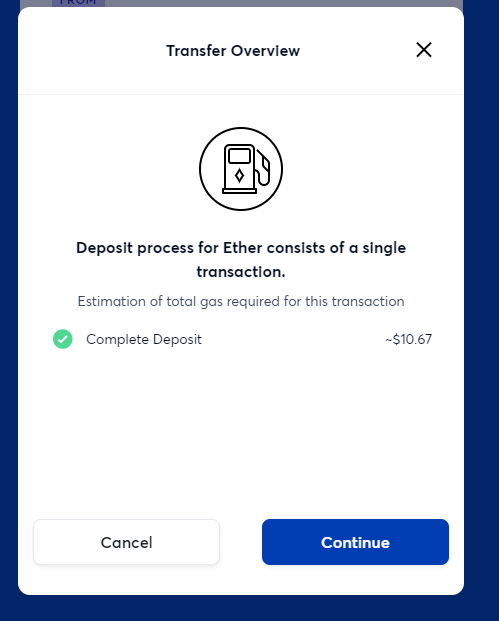
Once the transaction has been confirmed in Ethereum it will take 7–8 minutes for the funds to be set up on the Polygon network. Press Continue to proceed.
You will need to pay a transaction fee in Ethereum for this transfer of funds onto Polygon. This fee varies based on the congestion of the Ethereum network.
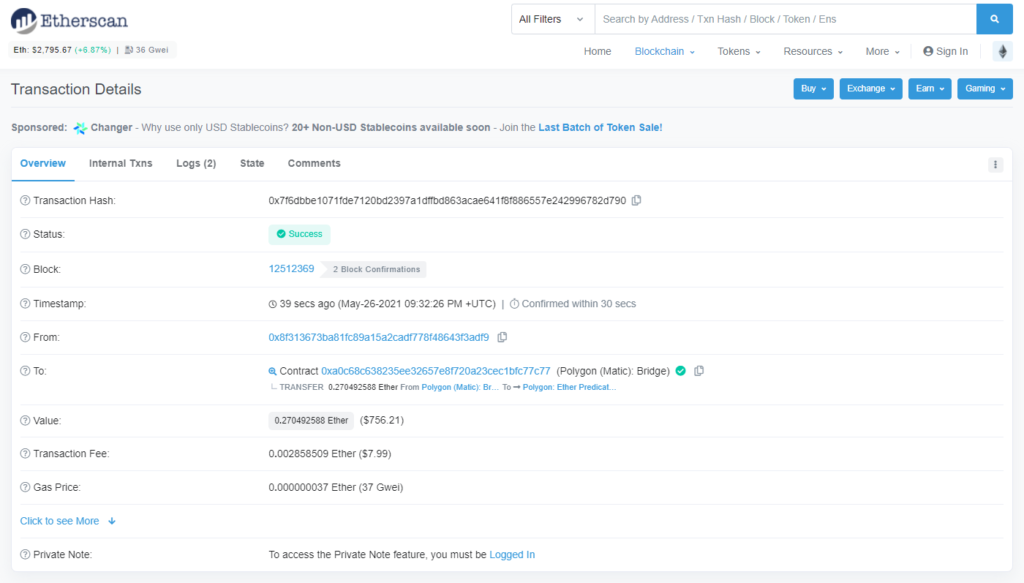
To estimate the congestion of the Etherum network, go to Etherscan.io and check the gas price in Gwei. 39 Gwei is very low for Ethereum so my transaction fee will be relatively cheap for Ethereum.

Press the Continue button to proceed.
Press Continue to initiate the Ethereum transaction.
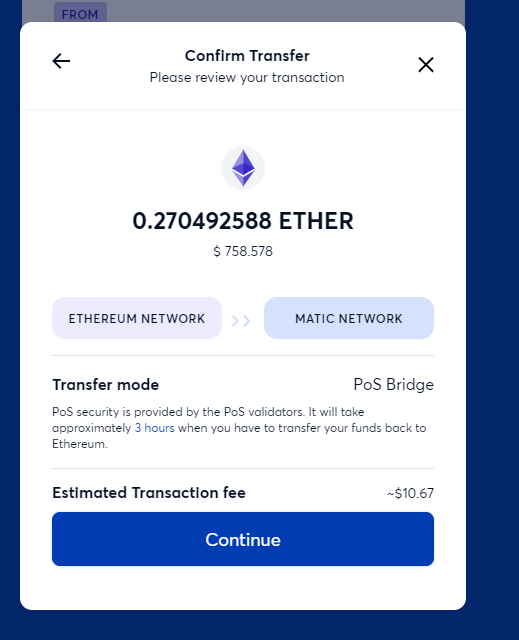
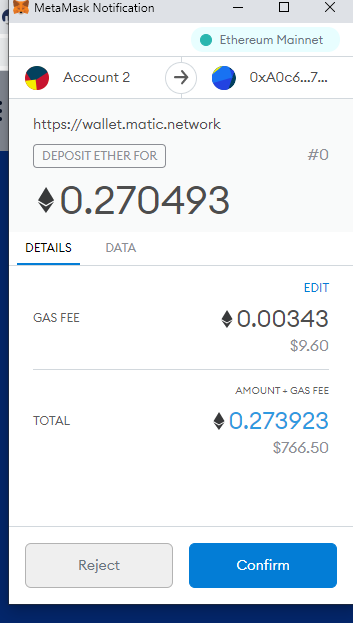
Select the Confirm button in Metamask to make the Ethereum transaction.
You will see a screen showing that the Transfer is in progress.
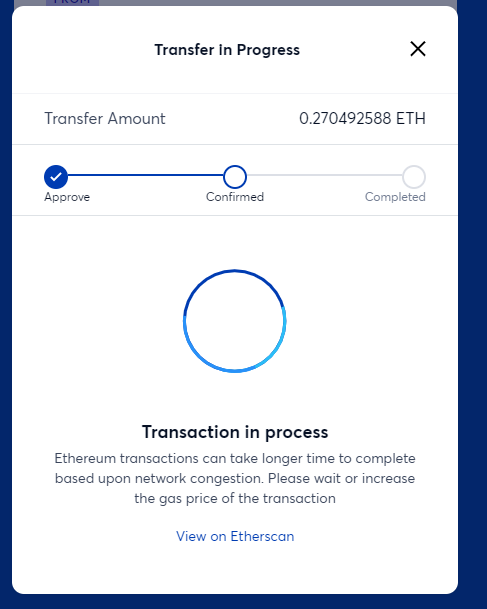
When the transaction has completed via Metamask, the screen will update to show the transaction in progress has moved into the Confirmed state.
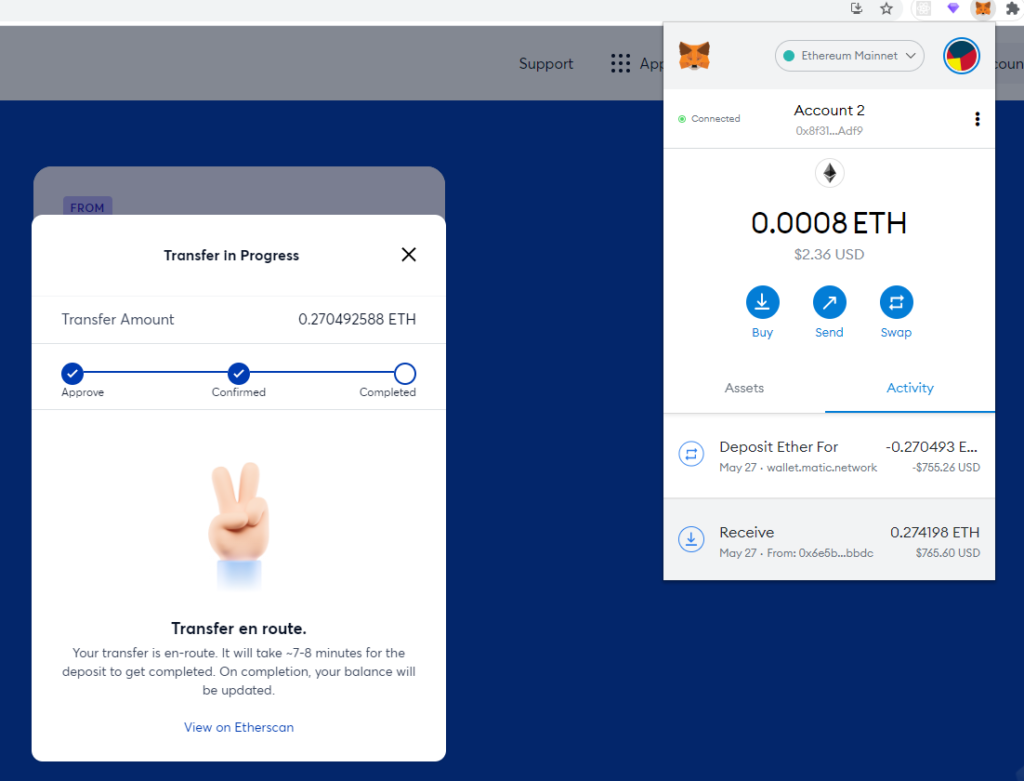
If you look at your transaction in Etherscan, you will see it has been successfully confirmed. We will need to wait 7–8 minutes before the funds will appear on the Polygon network.
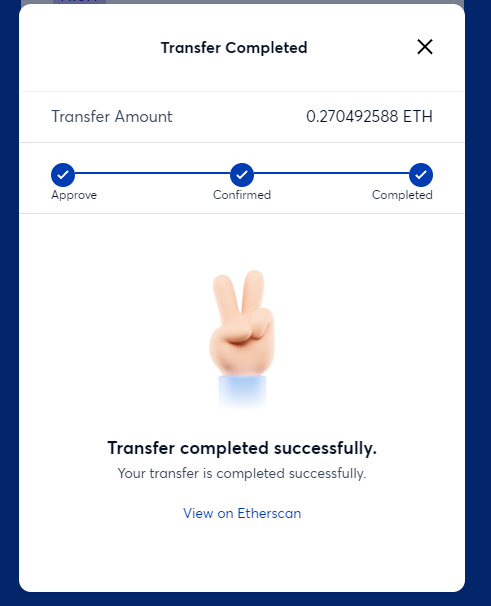
Once the funds have been transferred to Polygon, the transfer will be shown as Completed.
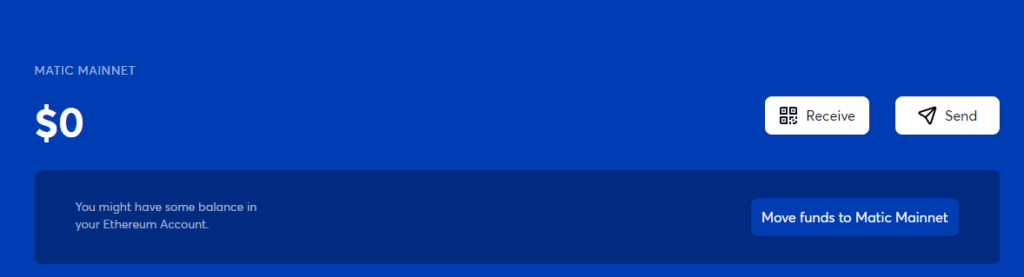
In your Matic wallet, you will see that your Matic Mainnet balance has increased from $0 to the value of your cryptocurrency on the Polygon network in USD.
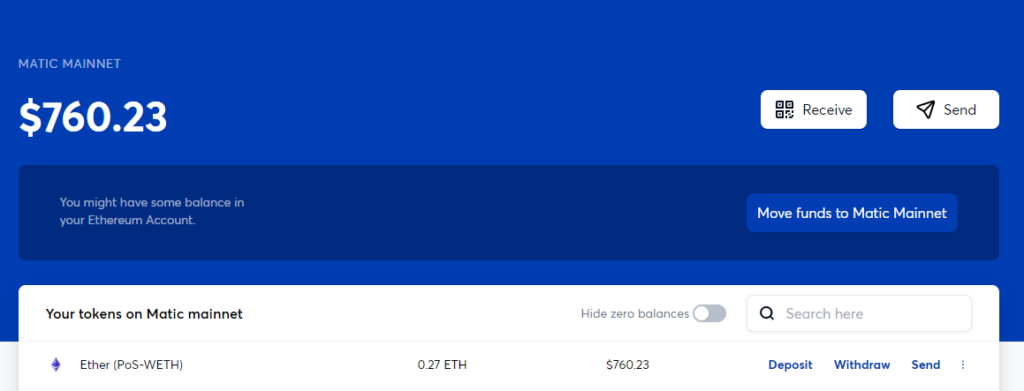
To see these funds in your Metamask wallet, change networks from the Ethereum Mainnet to Polygon by selecting “Ethereum Mainnet” then selecting “Matic Mainnet”.
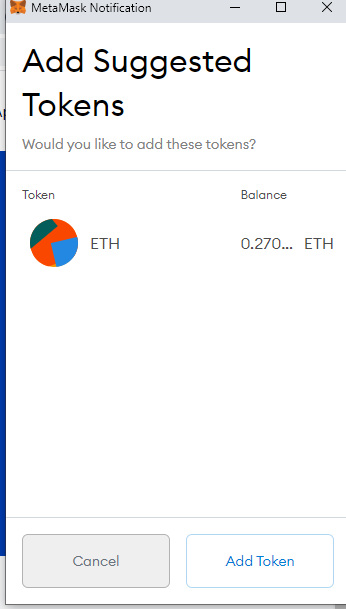
You will initially not see your ETH in your Metamask wallet, this is because you will need to add a custom token to your Matic Mainnet Metamask wallet.
Look for the Ether (PoS-WETH) token in the web wallet, select the three dots and choose “Add to Metamask”.
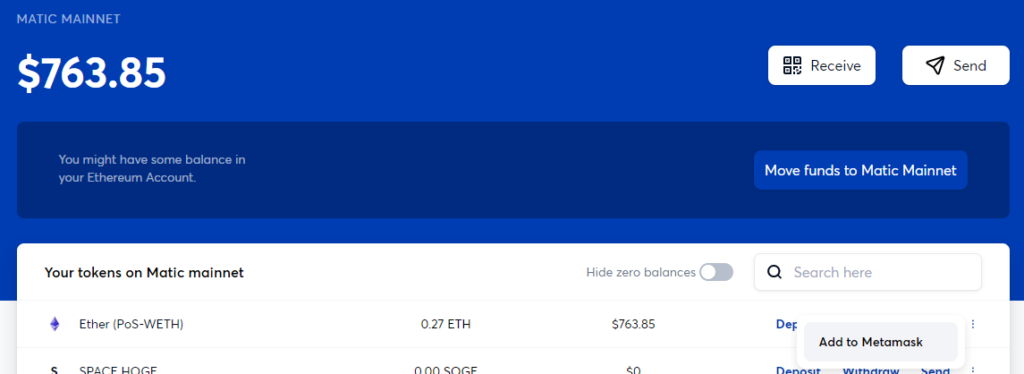
In the Metmask window, you will see a “Add Suggested Tokens” window with your ETH balance in Polygon, select the “Add Token” button.
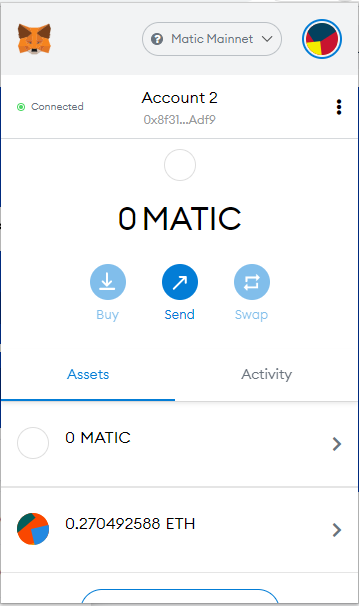
Now you will see your ETH balance you have transferred over in your Metamask wallet on Polygon.
How to Acquire Some MATIC
All transactions on the Polygon network are paid in small fractions of a MATIC token.
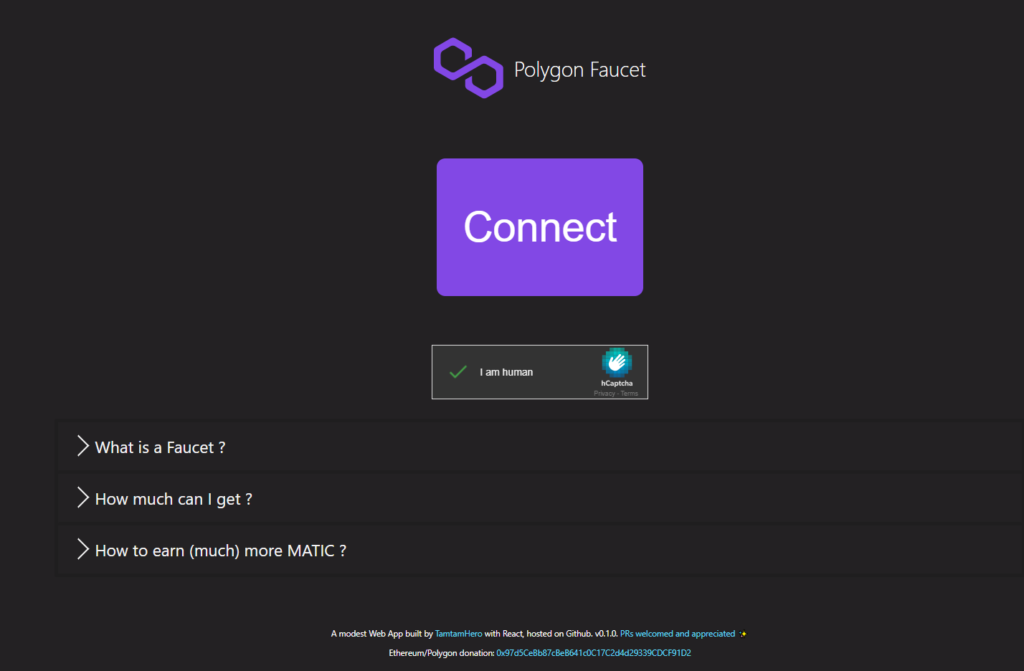
There is a faucet available at https://matic.supply that will give you some free MATIC to get started.
Make sure you are on the Polygon network in Metamask, then visit https://matic.supply/.
Complete the CAPTCHA then select the Connect button.
Select the “MetaMask Connect to your MetaMask Wallet” button then in the MetaMask popup, select your account containing the bridged funds and select “Next”.
Then select the “Receive” button.
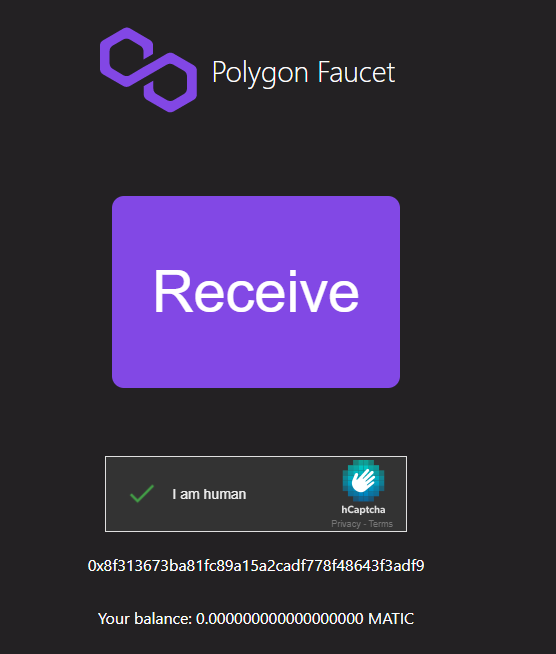
If it has worked correctly, then you will see a popup showing “Transaction sent”.

Then if you check your MATIC balance in Metamask you should see 0.001 MATIC in your wallet.

It may take a few tries for it to work, if you still are having issues please join the Aussie Gotchi Gang Discord and mention you need some MATIC and I will send you a small amount to get you started.
How to Buy GHST on Polygon
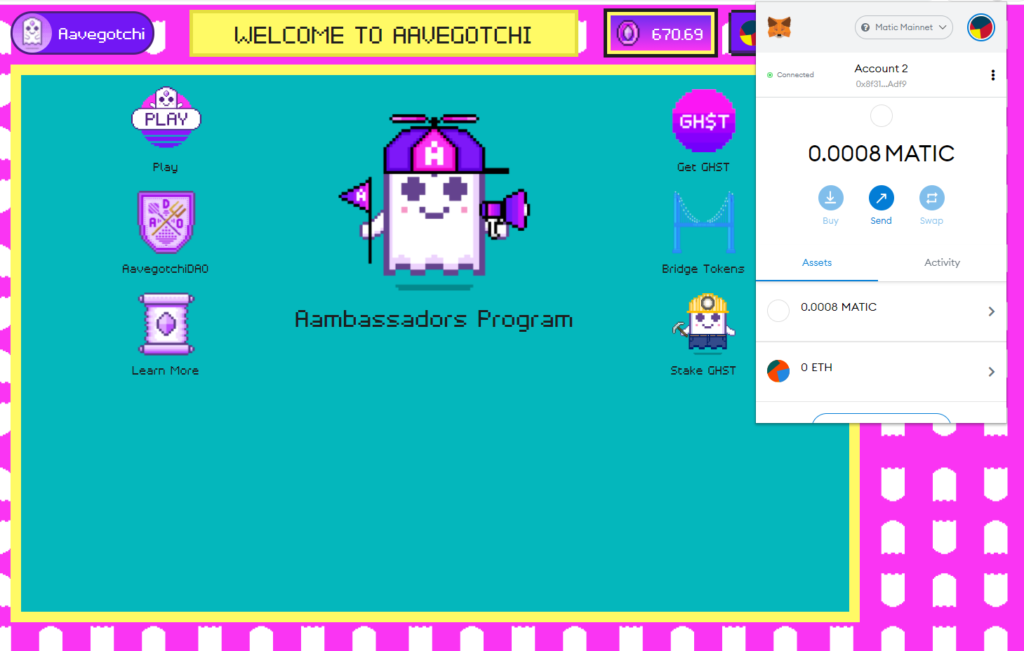
Now that we have some MATIC we are ready to use the Polygon network.
Aavegotchi has a token called GHST which is used throughout the entire Aavegotchi ecosystem including for purchasing portals to get your Aavegotchi.
To get GHST tokens we will use the Quickswap decentralised exchange at https://quickswap.exchange/
Connect your Metamask wallet using the Polygon network to Quickswap and you should see that you have some MATIC ready to swap in Quickswap.
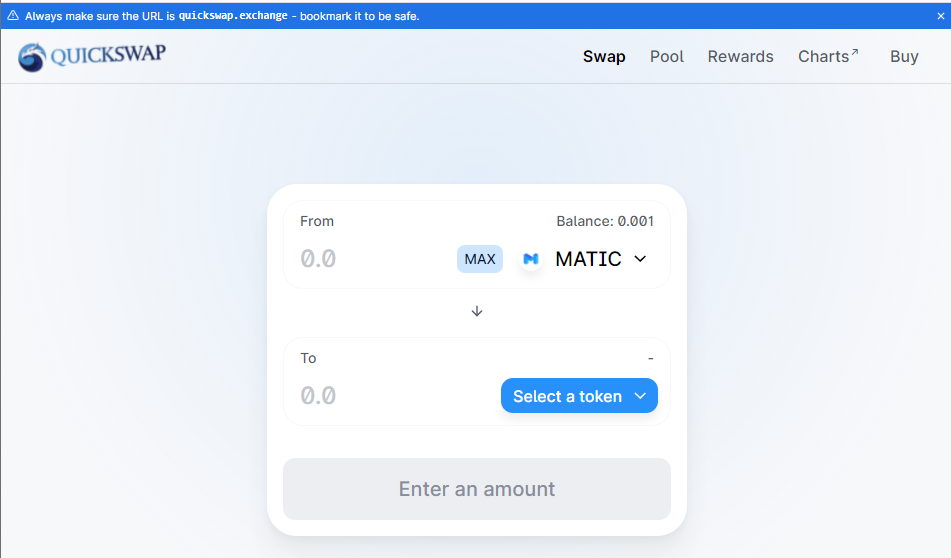
Change MATIC to ETH, then in the second slot select the GHST token. Enter the amount of ETH you want to trade for GHST, then select the “Approve ETH” button which is required in order to swap the tokens.
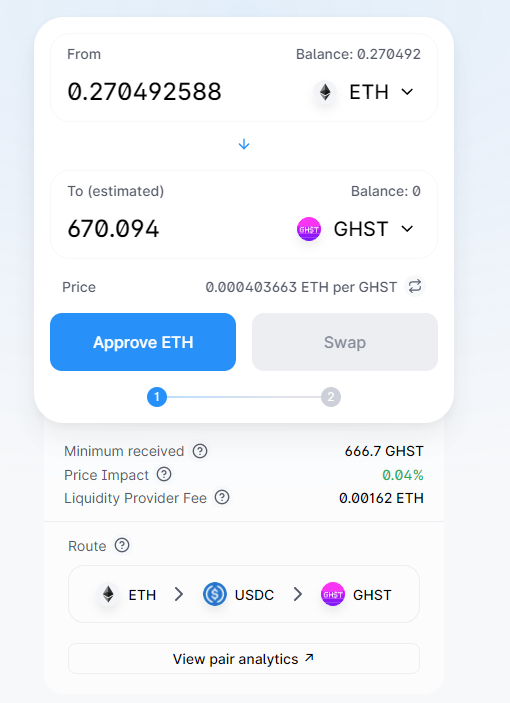
The Approve ETH transaction will need to be made via a Polygon transaction using your Metamask wallet. Select Confirm in Metamask to make this transaction.
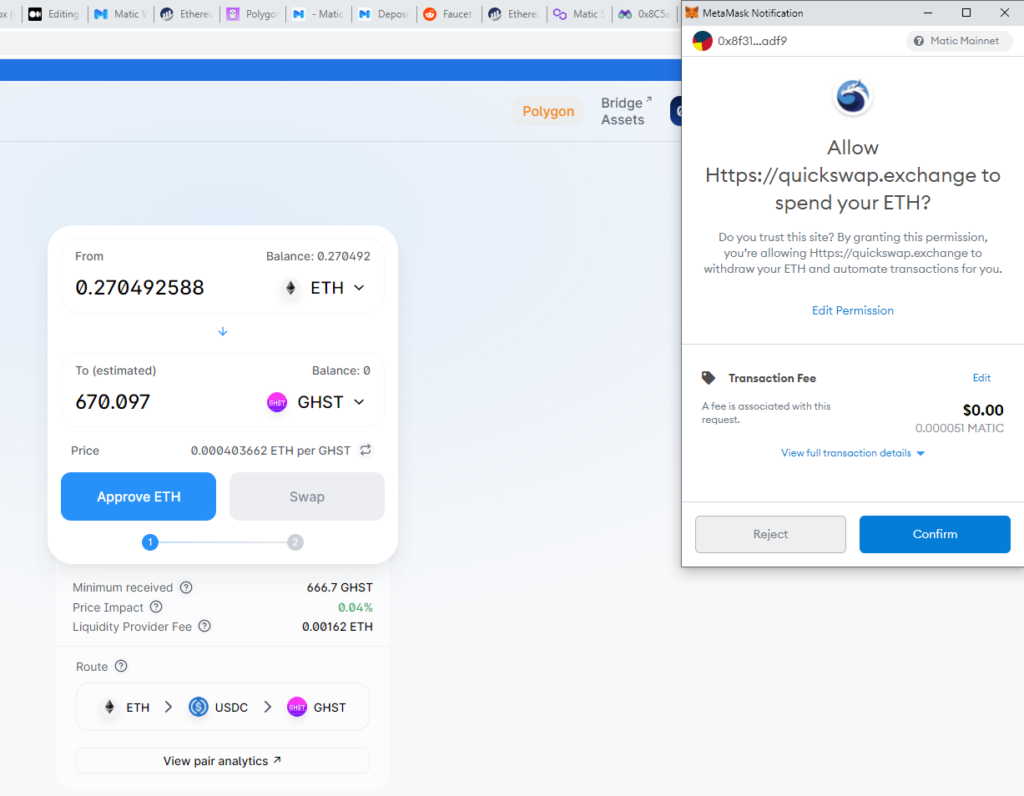
After the approval has been processed, select the Swap button to swap the tokens to acquire GHST.
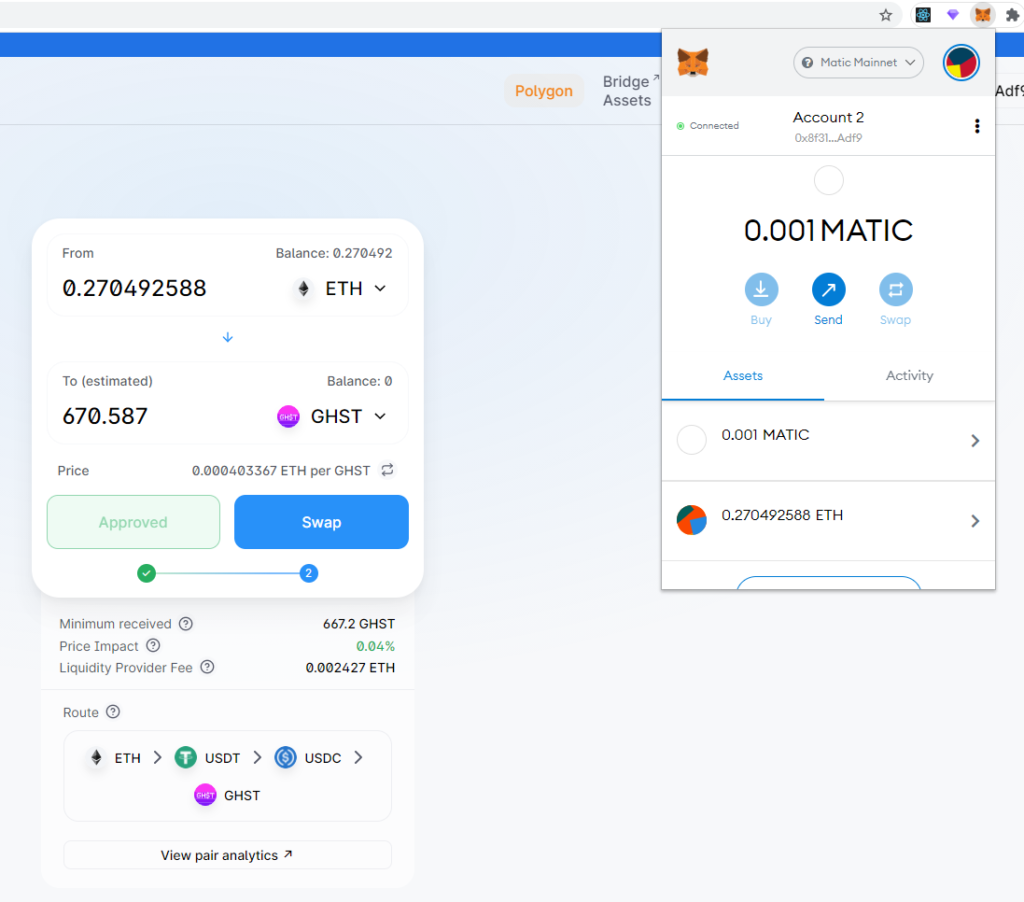
Now you will see that you have swapped your ETH for GHST tokens.
Given that you only have a small amount of MATIC from the faucet, it is also a good idea to acquire at least 0.1 to 1 MATIC by trading on Quickswap to allow for future transactions you will make on the network.
How to Buy a Portal on Aavegotchi.com
Next, we will purchase an open portal from the Aavegotchi Baazaar, which we will use to summon our first Aavegotchi.
To play Aavegotchi, visit https://aavegotchi.com and connect your Metamask wallet on the Polygon network containing your GHST tokens.
You should see on the top right side of the screen the amount of GHST tokens that are in your wallet.
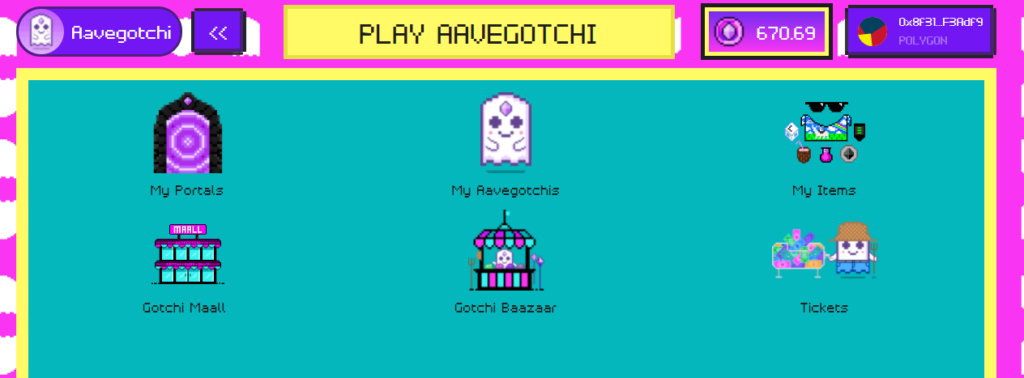
We will use the Aavegotchi Baazaar to purchase an open portal. Select the Play button.
Then select the “Gotchi Baazaar” button.
Select the open portal collection on the left and you will be able to scroll through the open portal listings.
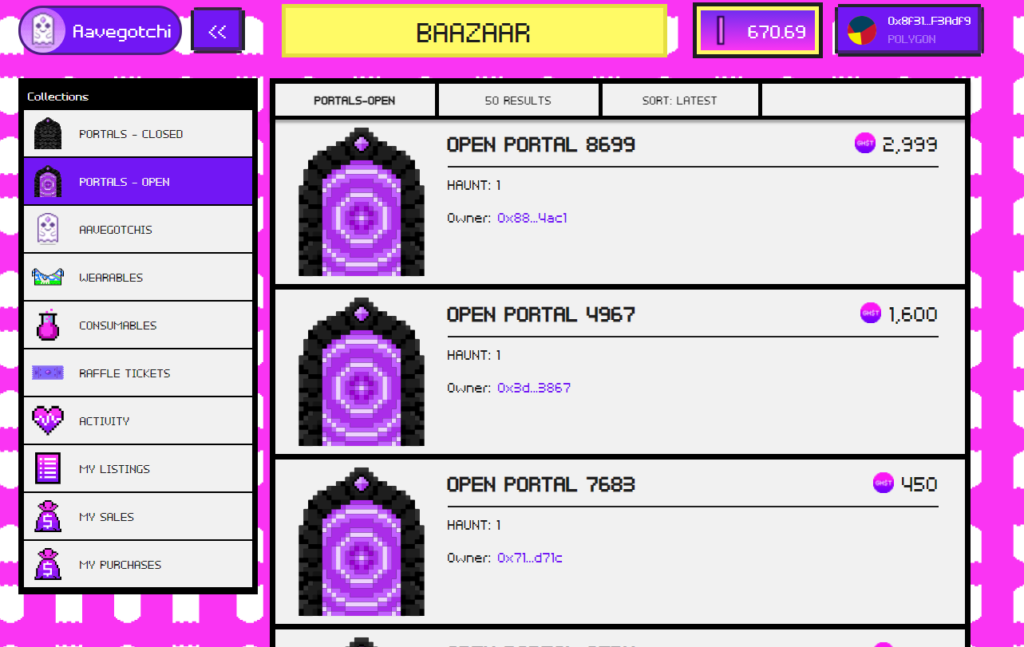
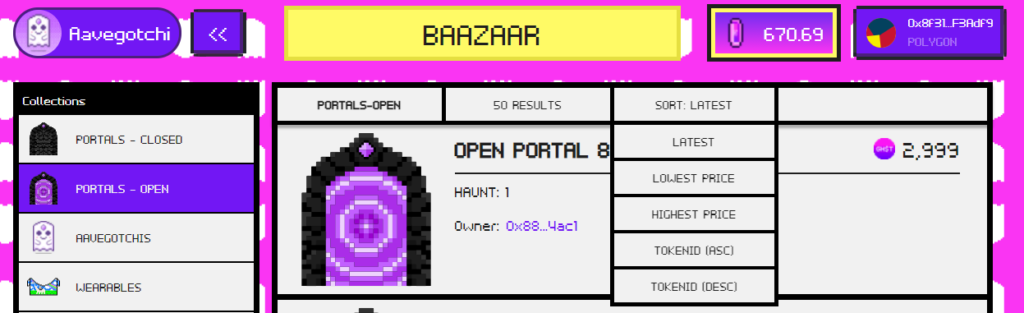
By default the listings are sorted by the most recent listings first, I would recommend you change this to sort by the lowest price first by selecting SORT: LATEST then choosing LOWEST PRICE.
Open portals contain 10 Aavegotchis which are visible on the listing page. When you summon the Aavegotchi out of the portal, you have to choose one of the ten Aavegotchis.

There are many factors that make for a good Aavegotchi. I would start by looking for a portal that contains an Aavegotchi with the highest base rarity score that fits into your budget.
Keep in mind not to spend all of your GHST tokens as you will also need to acquire some staking collateral to add to your Aavegotchi to summon it. This is the mechanism for how your Aavegotchi earns interest. The amount of collateral required is visible against each Aavegotchi inside the open portal on the listing page.
When you are ready to purchase a portal, select the “Approve Spend GHST” button against the open portal listing.
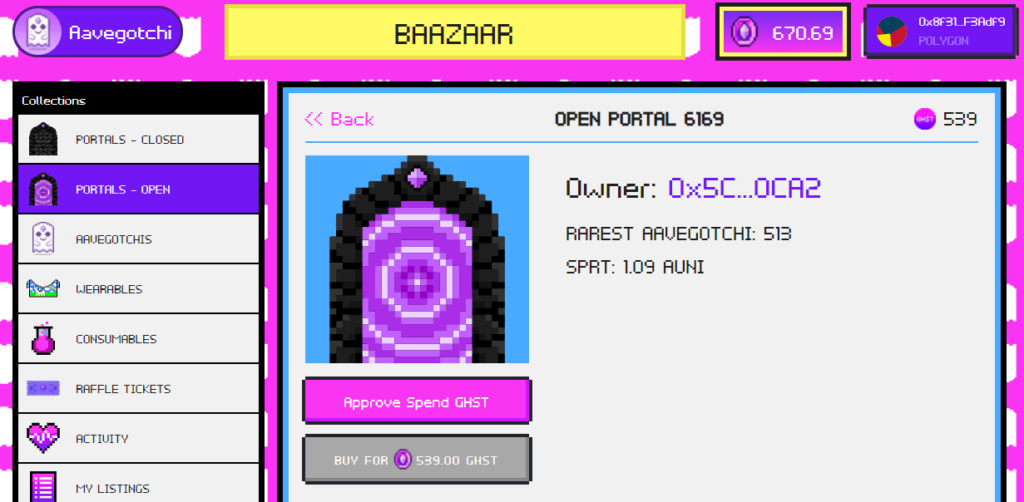
Then in Metamask confirm the transaction.
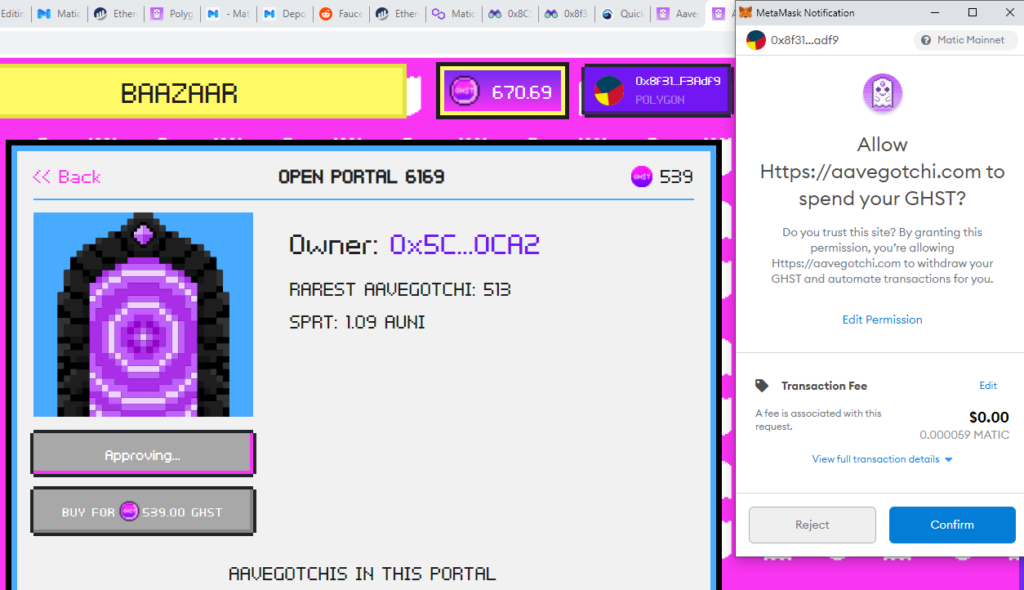
Once the approval is processed, select the Buy button to purchase the portal, which you will also need to confirm in Metamask.
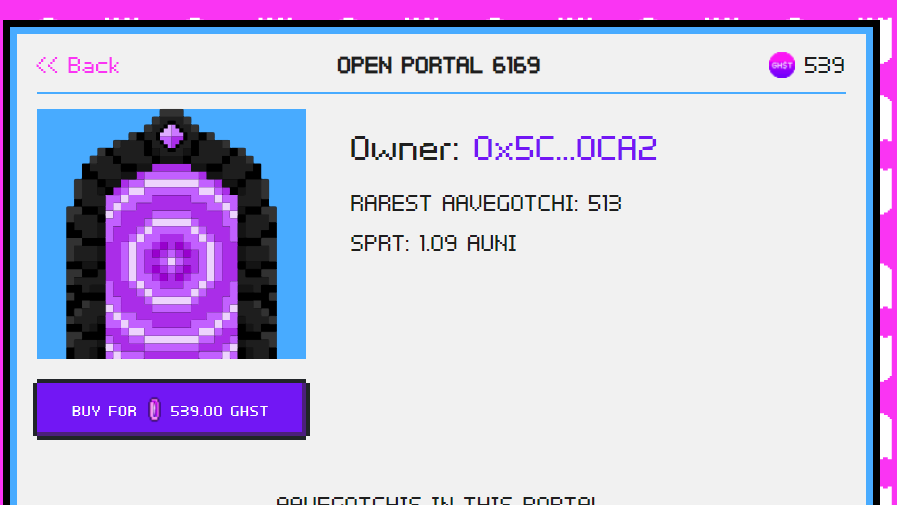
If you have successfully purchased the portal, your GHST tokens will be deducted from your account balance.
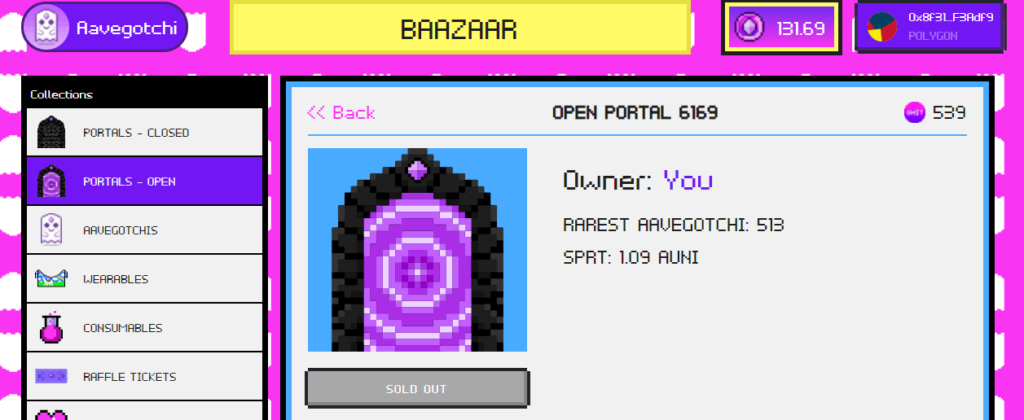
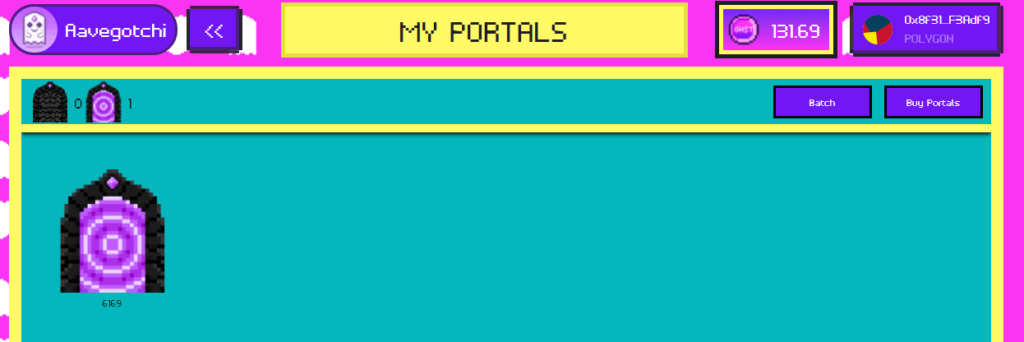
To view your purchased portal, go back to the Play menu at https://aavegotchi.com.
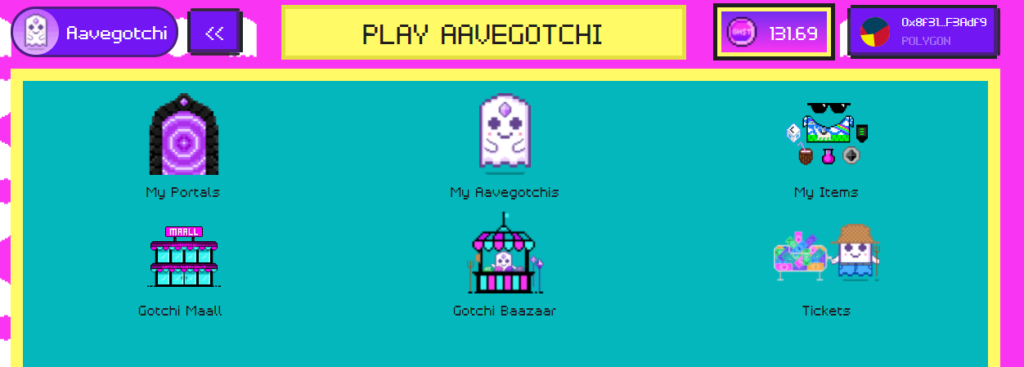
Then select “My Portals” and select the Open Portals on the right.
How to Summon an Aavegotchi
Now you are able to summon your Aavegotchi from the open portal.
Select the open portal from the My Portals screen and navigate through to the Aavegotchi you want to summon.
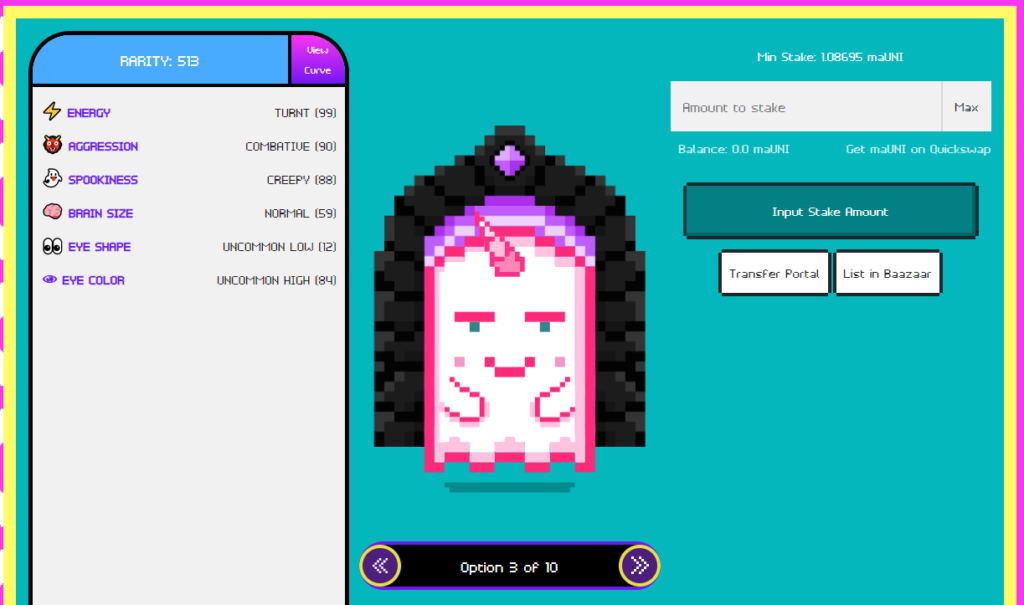
I will be summoning an Aavegotchi that requires maUNI tokens, which is an interest-bearing UNI token from the Aave lending platform.
To acquire these tokens, select the “Get maXXX on Quickswap” text underneath the “Amount to stake” field.
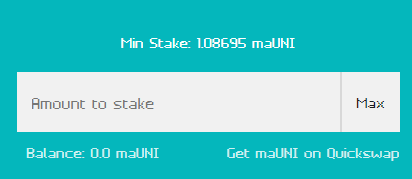
This link will navigate you to Quickswap, where you can trade my GHST tokens for the recent maXXX tokens. Just like before, first we will need to “Approve GHST” via a Metamask transaction.
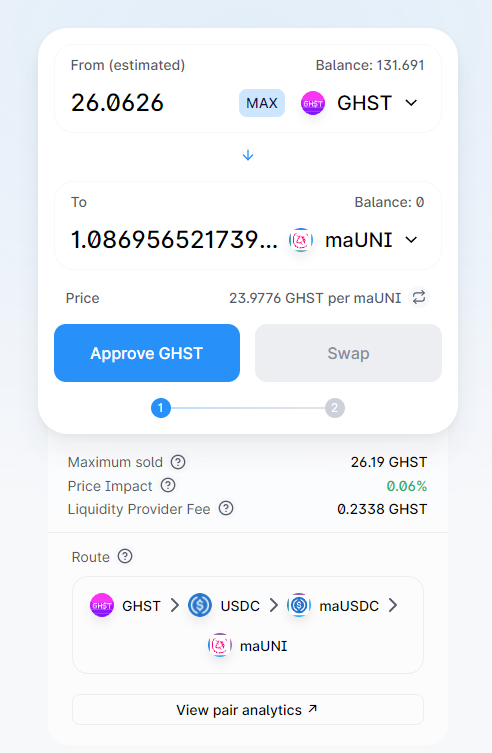
Once this is complete, then we can make the swap.

After the swap is complete, my maUNI balance has been updated.
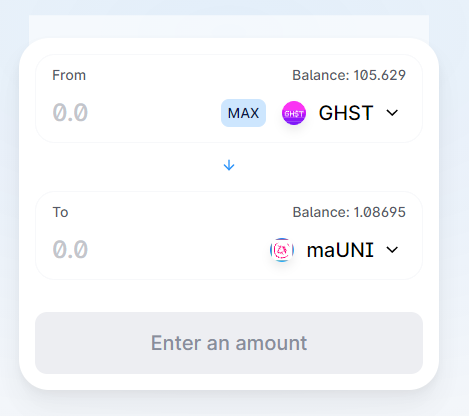
Then we can go back into the open portal and refresh the page and find the Aavegotchi we wish to summon.
Then select the “Max” button to supply the maUNI tokens required, then select the “Approve Transfer” button to make an approval transaction via Metamask.
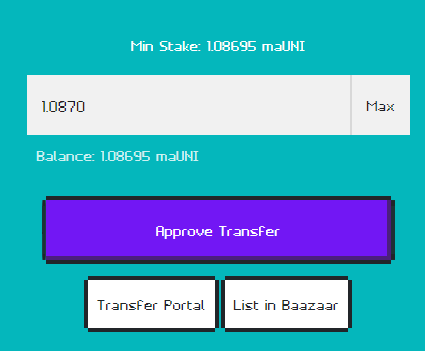
After that transaction has been processed, you can select the “Claim” button which will make another transaction to lock up your collateral inside your Aavegotchi to summon it.

Give your Aavegotchi a name, then select Save, which will create a Metamask transaction.
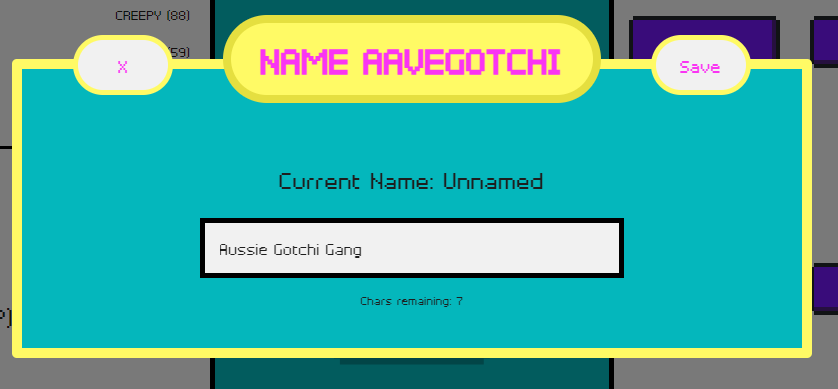
Once that transaction is complete, you will see that you have done it and you now have your very first Aavegotchi.

How to Earn Money with Your Aavegotchi
Finally, I will share a few tips on how to earn money with your Aavegotchi.
Earning Money Via Interest
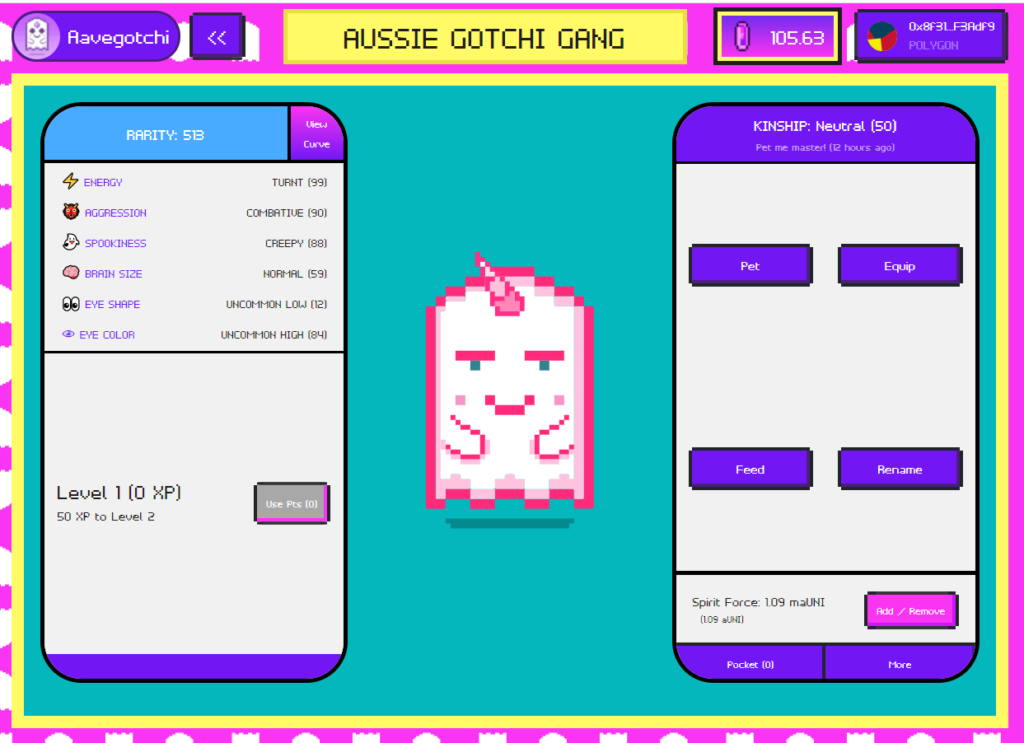
Your Aavegotchi will automatically accrue interest from the collateral staked when summoning your Aavegotchi. Periodically you may remove this interest earned from the collateral by selecting the “Add/Remove” button when viewing your Aavegotchi. However, you must leave a minimum amount that was used to summon the Gotchi.
To get all of the collateral back, your Aavegotchi can be sacrificed. Which is an extreme measure that will remove your Aavegotchi from the game and return your collateral to you, also allowing you to distribute your Aavegotchi’s XP to another Aavegotchi.
Rarity Farming
Rarity Farming competitions happen on a seasonal basis.
It uses funds earned from Aavegotchi Haunts where portals are first created, to distribute to Aavegotchis that score the highest in rarity, kinship, and experience.
The rarity score of your Aavegotchi is based on the traits of your Aavegotchis and wearables added to your Aavegotchi.
The further any of the 6 traits (Energy, Aggression, Spookiness, Brain Size, Eye Color, and Eye Shape) are from the value 50, the higher your Aavegotchi’s rarity score will be.
Wearable purchased from the Baazaar influence these traits and also offer a base rarity value depending on the rarity of the wearable.
The kinship score of your Aavegotchi can be increased by petting your Aavegotchi every 12 hours as well by drinking Kinship potions acquired from the Aavegotchi Baazaar.
The experience points held by your Aavegotchi can be increased by participating in community events, playing minigames, drinking XP potions acquired from the Baazaar and by participating in the Aavegotchi DAO.
To learn more about rarity farming, I have embedded a video I created on how rarity farming works for season 1, which ends June 15th 2021.
Connect with us
I have created an Aussie Gotchi Gang Discord channel where I will share the latest updates on the game and help the Australia Aavegotchi community grow.
Check it out and join today — https://discord.gg/MU42xct4cB