The Aavegotchi team has released a new feature called Pet Operator into their smart contracts.
Pet Operator allows the owner of an account holding Aavegotchis to give permission to another account to pet their gotchis without giving any other permissions to that external account.
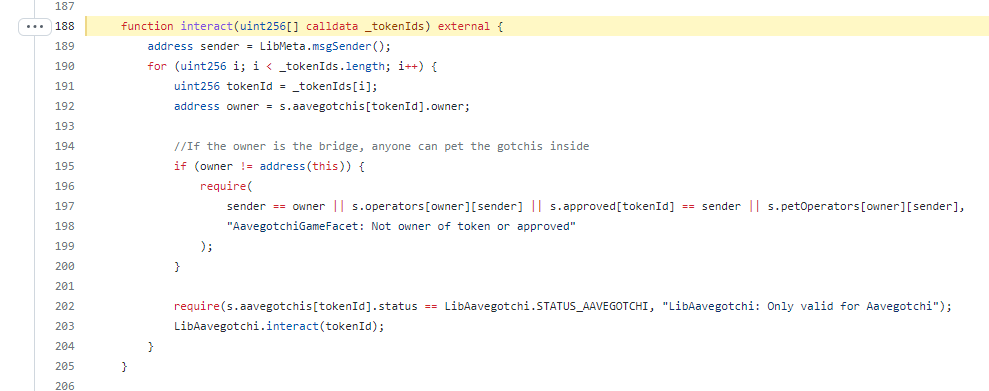
See the updated Pet Operator code inside the interact function.
Pet Operator offers a secure method to allow another account to pet your Aavegotchis without having to worry about them stealing your NFTs or funds out of your account.
With the security and ease of mind offered by Pet Operator combined with the smart contract automation framework Gelato, in this post I will cover how to automate the petting Aavegotchis every 12 hours to boost kinship to be used in the REALM and for GHST rarity farming.
The process we will follow in the tutorial to automate petting of our gotchis is the following:
- Set up our Solidity development environment using Austin Griffith’s awesome starter kit for development on Ethereum scaffold-eth
- Import the PokeMeReady.sol Solidity contract from Gelato
- Create the LazyPetter.sol Solidity contract that contains the code for petting your Aavegotchis
- Create the LazyPetterResolver.sol Solidity contract that is used to tell the Gelato framework when your Aavegotchis are ready to be pet
- Compile and deploy these contracts to the Polygon network using Hardhat and scaffold-eth
- Use etherscan-verify and Polygonscan API to verify contracts on Polygonscan.com
- Use louper.dev with the Aavegotchi Diamond on Polygon to give your LazyPetter.sol contract address the Pet Operator permission
- Deposit MATIC funds into the Gelato network to be used for automating transactions
- Create the automation task using the Gelato network web UI (currently in Beta)
- Verify the automation task has executed correctly
If you are not technical or comfortable using Solidity and you are interested in automating the petting of your Aavegotchis securely, consider checking out the GotchiCare paid service (which also uses Gelato and Aavegotchi Pet Operator).
GotchiCare Website: https://gotchicare.com/
GotchiCare Discord: https://discord.com/channels/711915840869761045
Alternatively, you can try the free petting service Gotchi.world: https://www.freepetting.com/
All of the code shared in this tutorial can be found in this GitHub repository: https://github.com/programmablewealth/auto-gotchi-petter
Setup Solidity development environment with scaffold-eth
Austin Griffith has created the ultimate resource for getting started with Ethereum development covering Solidity smart contracts and web front ends for these contracts called scaffold-eth.
Get started by cloning the scaffold-eth repository at https://github.com/scaffold-eth/scaffold-eth
Follow the scaffold-eth README and get a local blockchain running using Hardhat with the following commands.
cd scaffold-eth
yarn install
yarn chain
Import the PokeMeReady.sol Solidity contract from Gelato
Gelato has a documentation page at the following link: https://docs.gelato.network/
The documentation also includes a tutorial on getting a counter smart contract automated using Gelato.
In part 1 of the tutorial, it includes a PokeMeReady.sol contract, copy this contract’s code and place it into the following directory.
/packages/hardhat/contractsThis will add some extra security to your smart contract as the PokeMeReady.sol has a function modifier called onlyPokeMe.
This will be used in the LazyPetter.sol contract to restrict the execution of the function containing the code to pet your Aavegotchis to only be called by the PokeMe contract address managed by Gelato.
Contract addresses for PokeMe are documented at the following link: https://docs.gelato.network/contract-addresses
Create the LazyPetter.sol Solidity contract for petting your Aavegotchis
We will use the Solidity version 8.0.0 for the LazyPetter contract.
Then we will import PokeMeReady.sol for use inside the LazyPetter.sol contract.
We will then create two interfaces containing functions we will be using from the Aavegotchi smart contracts, these interfaces are AavegotchiFacet and AavegotchiGameFacet.
In the AavegotchiFacet interface, add the function signature for tokenIdsOfOwner which we will use in the LazyPetter contract to retrieve a list of token IDs of Aavegotchis we will be petting.
In the AavegotchiGameFacet interface, add the function signature for interact to pet a set of gotchis by passing in a list of Aavegotchi token IDs.
The LazyPetter contract inherits PokeMeReady.
The constructor will contain parameters for the address of the PokeMe contract on Polygon, the address of the Aavegotchi Diamond contract on Polygon, and the address on Polygon containing the Aavegotchis we want to pet.
The interfaces will be set up in the constructor. We will also store the address containing the Aavegotchis we want to pet in a variable.
Finally, in the LazyPetter contract, we will add a function petGotchis, it will first check that at least 12 hours have elapsed.
If it has it will retrieve the token IDs of the Aavegotchis owned by the account using the tokenIdsOfOwner function and add them into an array of uint256 integers.
Then it will invoke the interact method on the AavegotchiGameFacet passing the Aavegotchi token IDs.
After that, it will update the lastExecuted variable if the pet was successful and we will restrict this method to only be called by the PokeMe address controlled by Gelato.
See the full code below for LazyPetter.sol
Create the LazyPetterResolver.sol Solidity contract for informing Gelato when to pet your Aavegotchis
The LazyPetterResolver will also use Solidity version 8.0.0.
We will add an interface IPetGotchi which will be used for communicating with the LazyPetter contract.
In the IPetGotchi interface, add the lastExecuted function signature to access the lastExecuted variable on the LazyPetter contract.
In the IPetGotchi interface, add the petGotchis function signature to access the petGotchis function on the LazyPetter contract.
The constructor will be passed the address of the LazyPetter contract which will be stored in a variable within LazyPetterResolver.
Finally, we will add a function called checker which returns a boolean value of true if at least 12 hours has passed since the LazyPetter contract’s petGotchis function was last executed, along with a execPayload with the data type bytes which contains a reference to the petGotchis function that needs to be called.
Code for LazyPetterResolver.sol
To learn more about resolvers in Gelato check out the Gelato network documentation: https://docs.gelato.network/
Compile and deploy contracts to Polygon
Next we will compile our smart contracts using Hardhat included inside scaffold-eth. We will need to fix any compilation errors before we deploy our contracts to the Polygon network.
Before we compile the smart contracts we will need to open the hardhat configuration file at the following location
/packages/hardhat/hardhat.config.jsIn the solidity compilers configuration list we will need to add an entry for solidity version 8.0.0
  {
        version: "0.8.0",
        settings: {
          optimizer: {
            enabled: true,
            runs: 200,
          },
        },
  },
To compile the smart contracts, open a new command line prompt.
cd scaffold-eth
yarn compile
You will need to correct any compilation errors before proceeding to deployment.
When you are ready to deploy your contracts, we will need to update the hardhat configuration file again.
Change the defaultNetwork from “localhost” to “matic”.
const defaultNetwork = "matic";Once this has been saved you will need to generate an account in scaffold-eth to deploy your Solidity contracts.
To generate an account in scaffold-eth, you need to run the command
yarn generateTo get your account balance in scaffold-eth, you need to run the command
yarn account You will need to send MATIC to this account to deploy your smart contract, I sent 10 MATIC and I had plenty left over after deploying around 10 contracts to Polygon.
After you have sent some MATIC, run the command again to check the MATIC balance has been updated.
Next, you will need to create a deployment script for your smart contracts. Create a new javascript file in the following directory
/packages/hardhat/deployCopy over the following code into the deployment script and change the address to the one that holds your Aavegotchis.
Now we are ready to deploy these smart contracts, to deploy the smart contracts use the following command
yarn deployIf the deployment was successful you will see the contract addresses for your deployed contracts Polygon. Look them up on Polygonscan to check they have been deployed.
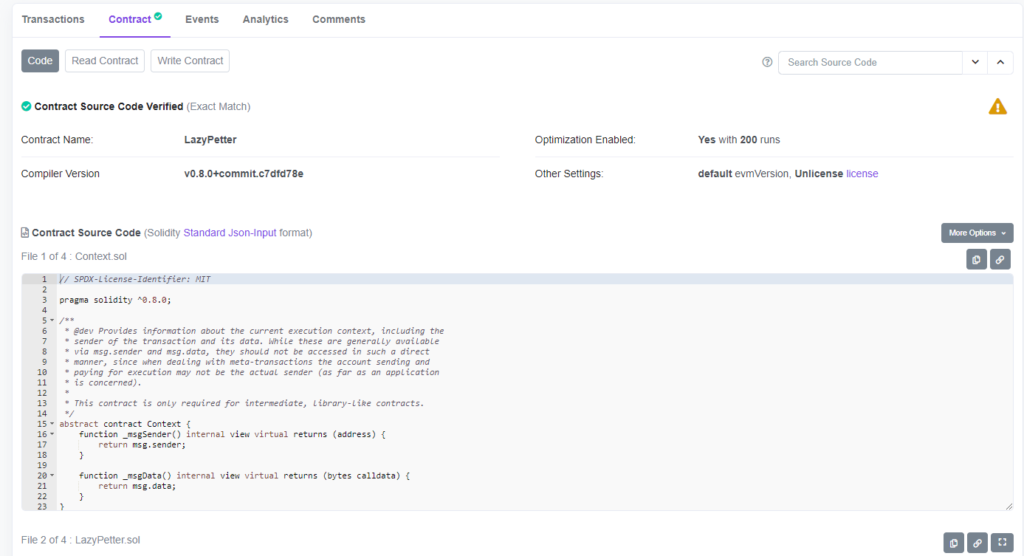
Polygonscan contract source code verification
Next we will need to verify the source code of our contracts on Polygonscan.
You first will need to go to polygonscan.com and create an account and get a developer API key.
Once you have got this, in the command line, you will need to go into the following directory to install the etherscan-verify plugin (that also works with polygonscan) for verifying contracts
cd /packages/hardhatThen to install the hardhat etherscan plugin, use the following command
yarn add @nomiclabs/hardhat-etherscan
After this, you will need to open up the package.json file in the following directory
/packages/hardhatOnce opened, add the following code inside the scripts configuration using your Polygonscan API key
"etherscan-verify": "hardhat etherscan-verify --api-key YOUR-POLYGONSCAN-API-KEY"Then you can execute the following command, to verify your contracts on Polygonscan.com
yarn etherscan-verifyIf the command is successful, look up your contracts on Polygonscan and you should a section called code which has been filled out.
Enable Pet Operator permission with louper.dev
The Aavegotchi smart contracts use the diamond standard (EIP-2535) design pattern.
Nick Mudge who is a part of the Aavegotchi team describes what is the diamond design pattern very well in this YouTube video.
We can use the louper.dev website with the Aavegotchi diamond address to invoke functions on the various Aavegotchi facets within the browser.
https://louper.dev/?address=0x86935F11C86623deC8a25696E1C19a8659CbF95d&network=polygon
If you want to verify the diamond contract address in the URL is correct (which you always should for security measures), you can get this diamond contract address in the README file on the Aavegotchi smart contracts GitHub.
https://github.com/aavegotchi/aavegotchi-contracts
Using louper.dev, connect your account in Metamask on Polygon that contains your Aavegotchis.
Scroll down to the AavegotchiFacet and select the Write option.
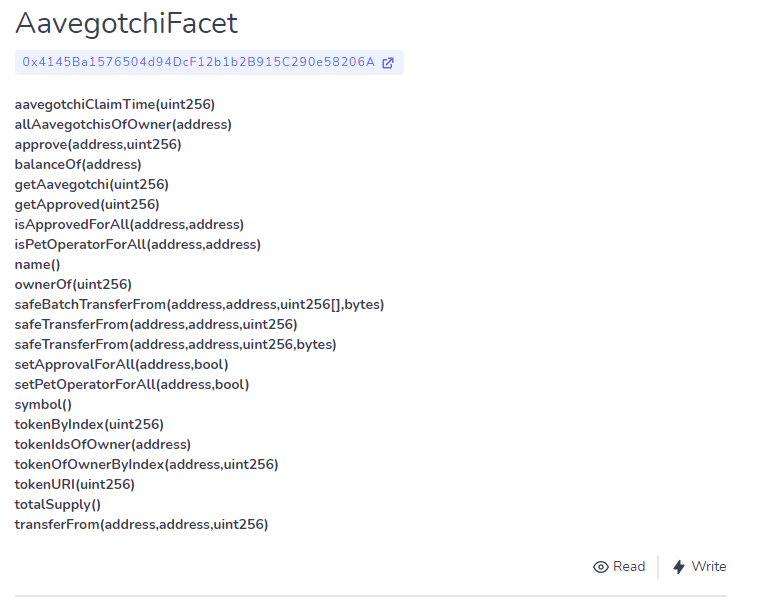
Select the setPetOperatorForAll method, enter the contract address of the LazyPetter contract in the _operator field and in the _approved field enter true, then select the Execute and wait for the transaction to approve.
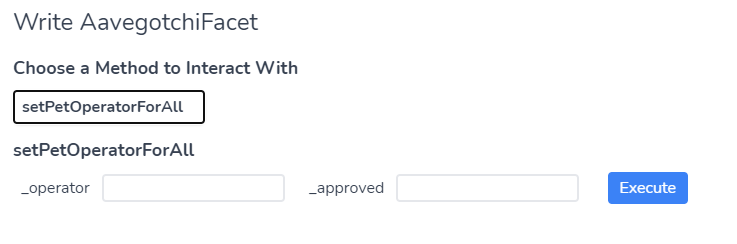
Now the Pet Operator has been enabled, if you want to revoke this in the future, put the same contract address in the setPetOperatorForAll function and set the _approved field to false and execute a transaction.
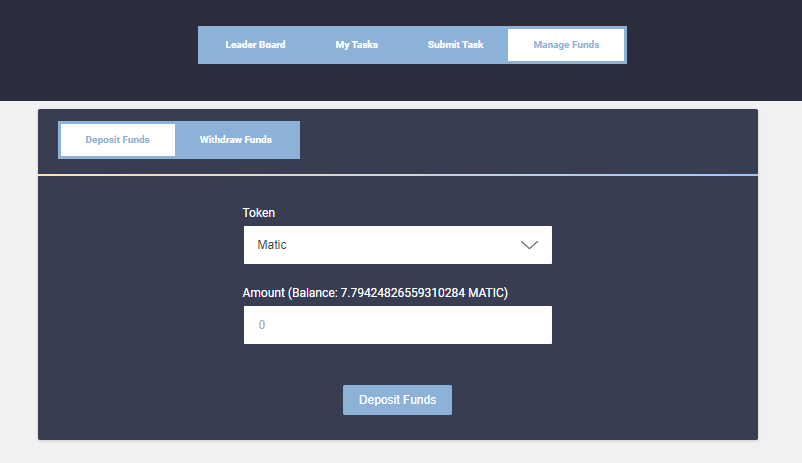
Fund task execution balance on Gelato Network with MATIC
Next, we will need to send some MATIC to the Gelato Network for usage in executing our tasks.
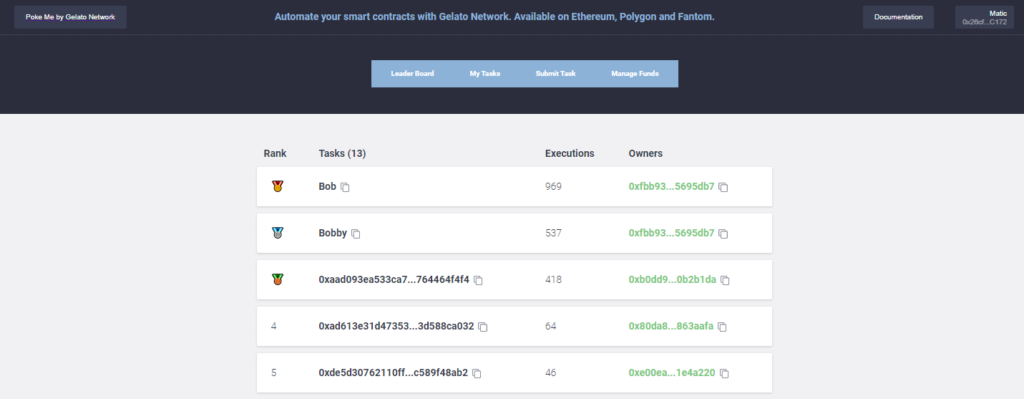
Go to the Gelato Network website: https://app.gelato.network/ (NOTE: the user interface for this website is currently in Beta)
Make sure you are connected with your Metamask in the browser on the Polygon network.
Select Manage Funds then deposit some MATIC into the Gelato Network. Each task execution currently costs 0.1 MATIC.
Funds can also be withdrawn when they are no longer required.
Create automation task using Gelato Network
Once your Gelato Network account has been funded with MATIC, we are now ready to automate task execution using the Gelato Network.
From the Gelato Network app page: https://app.gelato.network/
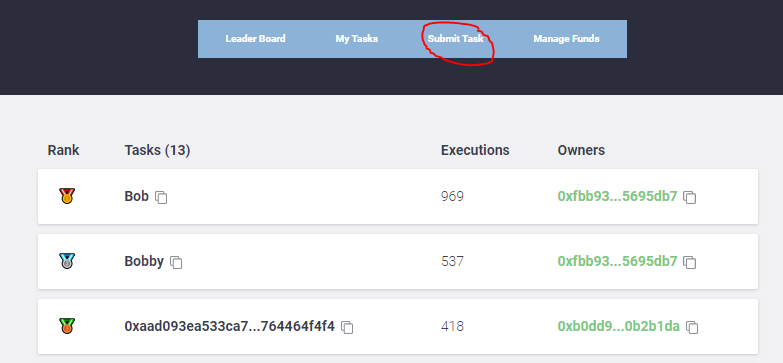
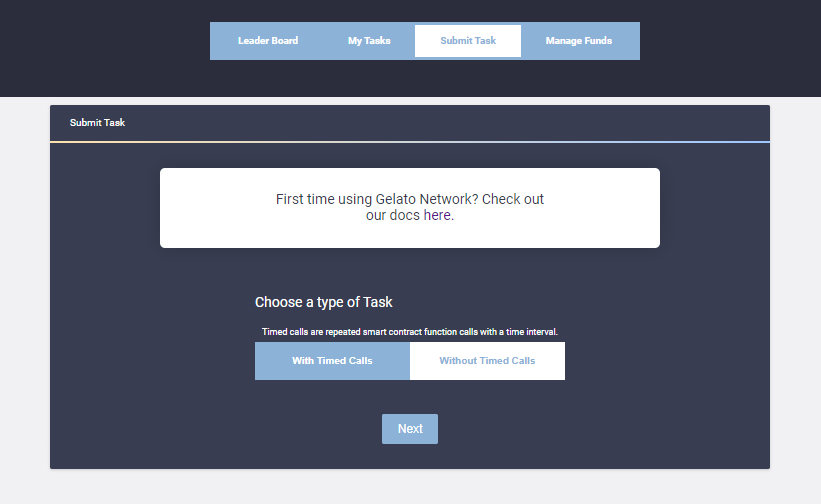
Select Submit Task
Select the “Without timed calls” option, then select Next.
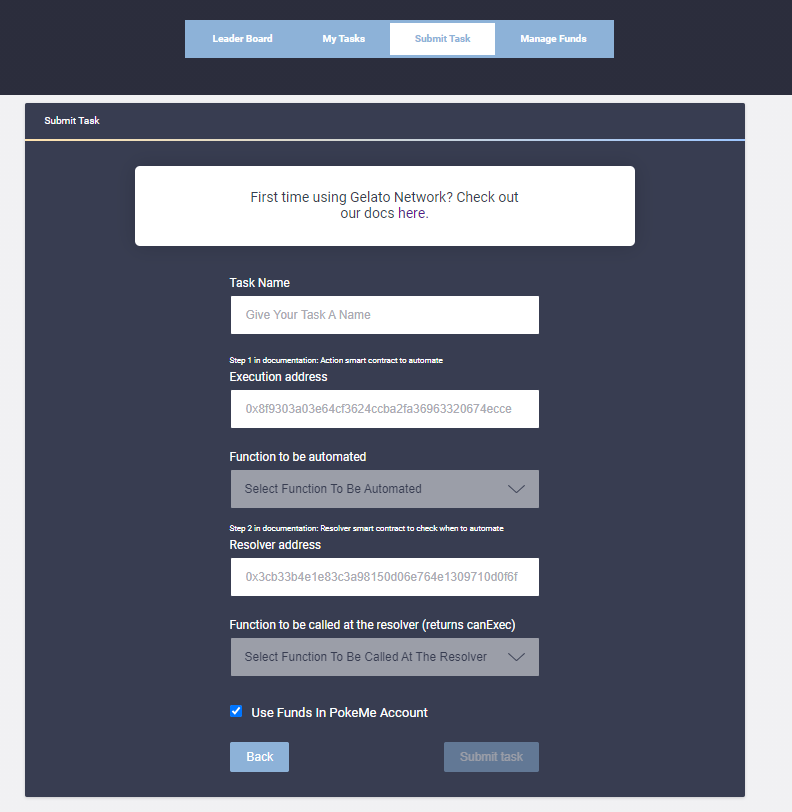
Give the task a name.
For the execution address, enter the LazyPetter smart contract address
Once the execution address has been entered, for the function to be automated select petGotchis()
For the resolver address, enter the LazyPetterResolver smart contract address
For the function to be called at the resolver select checker()
Before you start the automation, make sure your Aavegotchis are ready to be pet, because the bot will start petting within minutes of getting successfully deployed.
When you are ready you can submit the task for automation with a transaction on the Polygon network.
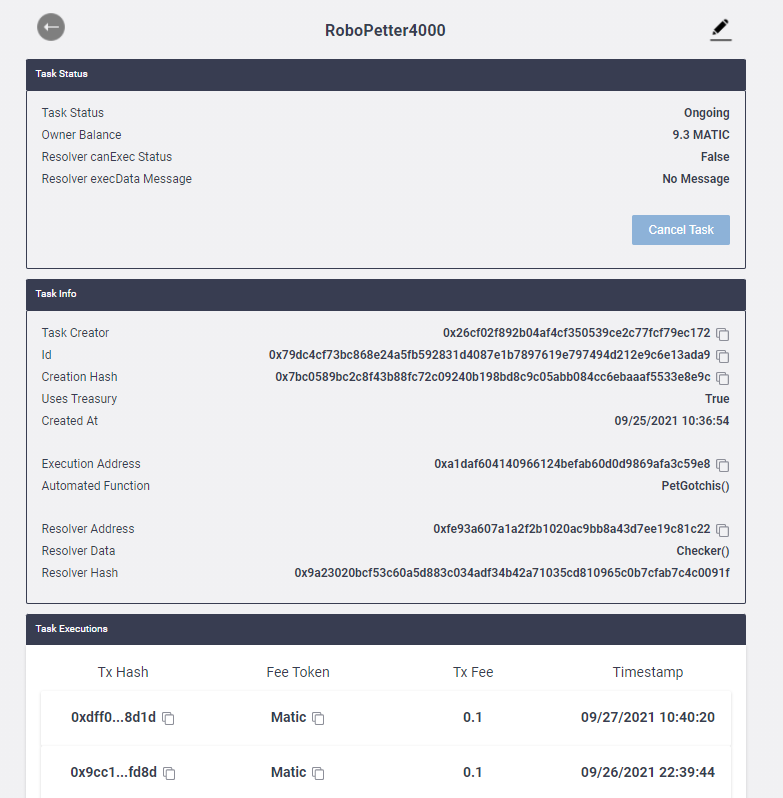
Verify task execution
Once your task has been created it will appear in the My Tasks section of Gelato.
If you select your task, in the task execution section you will be able to see every transaction created by your automated task in Gelato.
Give it about 5-10 minutes for the first execution to happen, if it has not happened at this stage there is likely something wrong with your contracts, funding balance on Gelato or pet operator permissions.
Visit aavegotchi.com to verify your gotchis are being pet correctly.